Vault Agent for F5 AST
Summary
Hashicorp Vault is a popular approach for secret management. We will cover an example using Vault to store BIG-IP passwords and use them with the F5 Application Study Tool (AST).
This part 1 of 2 articles:
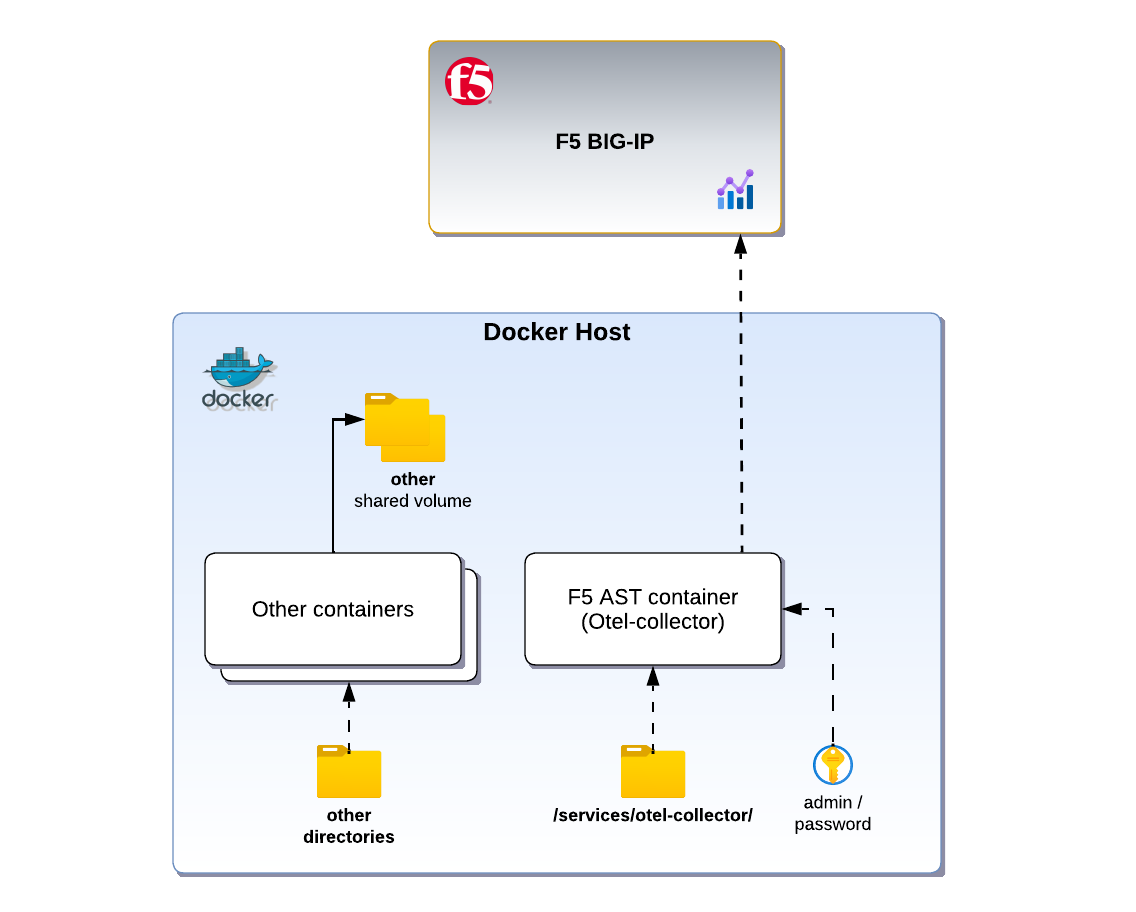
Overview of architecture
In this example, we’ll follow the official documentation to run F5’s Application Study Tool. Then we will modify our configuration by removing the .env.device-secrets file that contains the passwords for BIG-IP devices, and provide the value with an environment variable from the Docker Host.
Deploy AST with defaults
Prerequisties
- Hashicorp Vault server, running and accessible, with:
- a secret called bigip_password_1
- an AppRole with access to this secret
- Docker Engine and Docker Compose
Install and configure F5 AST
Follow the official documentation to install the F5 AST.
Once you have configured settings for device defaults and individual devices, you’ll configure device secrets in the file .env.device-secrets. When you run the configuration helper, configuration files created that will be mounted to your containers.
Validate AST with .env.device-secrets
Before we replace environment variables with dynamically-pulled values, run the AST to ensure that you are starting with a working configuration. Typically this means running docker compose up.
After following all default installation steps, my docker-compose.yaml file looks as follows:
version: '3'
volumes:
prometheus:
grafana:
services:
prometheus:
image: prom/prometheus:v2.54.1
container_name: prometheus
restart: unless-stopped
stop_grace_period: 5m
volumes:
- ./services/prometheus/prometheus.yml:/etc/prometheus/prometheus.yml
- prometheus:/prometheus
command:
- '--config.file=/etc/prometheus/prometheus.yml'
- '--storage.tsdb.path=/prometheus'
- '--web.console.libraries=/etc/prometheus/console_libraries'
- '--web.console.templates=/etc/prometheus/consoles'
- '--web.enable-lifecycle'
- '--enable-feature=otlp-write-receiver'
- '--storage.tsdb.retention.time=1y'
ports:
- 9090:9090
networks:
- 7lc_network
otel-collector:
image: ghcr.io/f5devcentral/application-study-tool/otel_custom_collector:v0.9.3
restart: unless-stopped
volumes:
- ./services/otel_collector:/etc/otel-collector-config
command:
- "--config=/etc/otel-collector-config/defaults/bigip-scraper-config.yaml"
env_file:
- ".env"
- ".env.device-secrets"
networks:
- 7lc_network
grafana:
image: grafana/grafana:11.2.0
container_name: grafana
restart: unless-stopped
ports:
- 3000:3000
volumes:
- grafana:/var/lib/grafana
- ./services/grafana/provisioning/:/etc/grafana/provisioning
env_file: ".env"
networks:
- 7lc_network
networks:
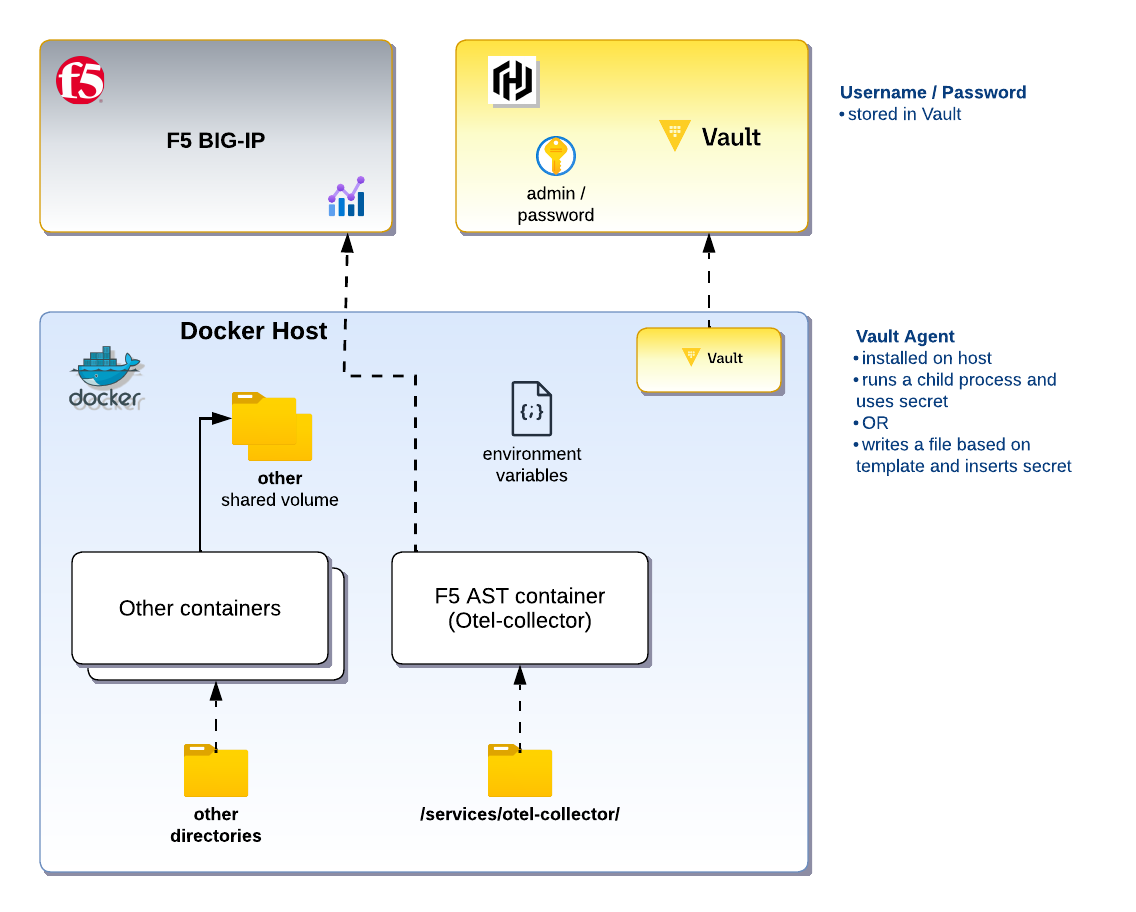
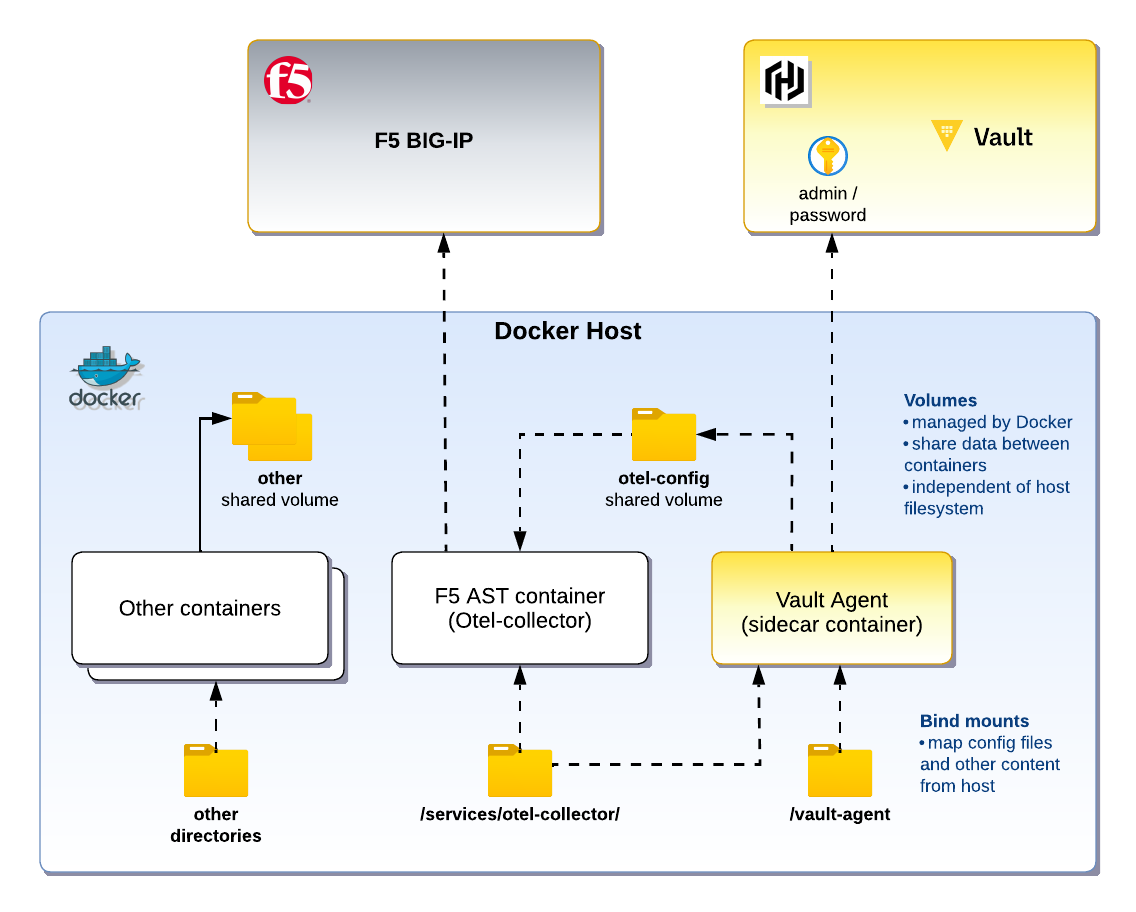
7lc_network:Use a Vault Agent running locally to provide a secret
Now let’s move away from using .env.device-secrets and install Vault Agent.
Install Vault Agent
These instructions are for Ubuntu 22.04, but you can easily do this on any major Linux distribution:
1
2
3
4
5
6
7
sudo apt update
sudo apt install -y wget unzip

wget https://releases.hashicorp.com/vault/1.15.4/vault_1.15.4_linux_amd64.zip
unzip vault_1.15.4_linux_amd64.zip
sudo mv vault /usr/local/bin/
vault --version
Let’s also create a tmpfs mount1. This is where we will write any files on the host that contain secrets.
1
sudo mkdir -p /mnt/vault-secrets
Let’s now edit /etc/fstab and add this line (you can adjust the size).
tmpfs /mnt/vault-secrets tmpfs nodev,nosuid,noexec,nodiratime,size=10m 0 0Mount it immediately:
1
sudo mount /mnt/vault-secrets
Create config files for vault agent
Now create a Vault Agent config file. Save this file to /etc/vault-agent.d/vault-agent.hcl
pid_file = "/run/vault-agent.pid"

vault {
  address = "https://<VAULT_SERVER>:8200"
}

auto_auth {
  method "approle" {
    mount_path = "auth/approle"
    config = {
      role_id_file_path = "/etc/vault-agent.d/role_id"
      secret_id_file_path = "/etc/vault-agent.d/secret_id"
      remove_secret_id_file_after_reading = false
    }
  }

  sink "file" {
    config = {
      path = "/mnt/vault-secrets/vault-token"
    }
  }
}

template {
  source      = "/etc/vault-agent.d/secrets.ctmpl"
  destination = "/mnt/vault-secrets/config.txt"
  perms       = "0640"
}
Make sure you have your role_id and secret_id files present.
Create the Vault Agent template file at /etc/vault-agent.d/secrets.ctmpl with the following content:
BIGIP_PASSWORD_1={{ with secret "secret/bigip_password_1/config" }}{{ .Data.data.password }}{{ end }}Create a systemd Unit for Vault Agent
This will make Vault Agent run at startup as a service. Create a file at /etc/systemd/system/vault-agent.service with the following content:
[Unit]
Description=Vault Agent
Requires=network-online.target
After=network-online.target

[Service]
ExecStart=/usr/local/bin/vault agent -config=/etc/vault-agent.d/vault-agent.hcl
Restart=on-failure
User=root
Group=root

[Install]
WantedBy=multi-user.target
And now, enable and start Vault Agent with the following commands:
1
2
3
4
sudo systemctl daemon-reexec
sudo systemctl daemon-reload
sudo systemctl enable vault-agent.service
sudo systemctl start vault-agent.service
Verify your Vault Agent service
- Verify the service is running:
sudo systemctl status vault-agent.service - Verify our secret is pulled from vault. Check the contents of
/mnt/vault-secrets/config.json
Update docker-compose.yaml
If the above verification was successful, we’re almost done. Just edit your docker-compose.yaml file:
     env_file:
       - ".env"
       - ".env.device-secrets" #<--- remove this line
       - "/mnt/vault-secrets/config.txt" #<--- add this line
What is special about this new file?
- the secrets are only ever in memory, thanks to tempfs
- Vault Agent can handle authentication, token renewal, and template rendering
Importantly, we could remove the file and use a host environment variable instead, or have Vault Agent run a process where the value of the secret is an environment variable for that process only. For example, we could have Vault Agent run the command “docker compose up” and the environment variable would be accessible to this process, but not other processes on the host.
Conclusion
Thanks for reading! Please reach out if you have any questions or feedback.
-
Tmpfs is a file system which keeps all of its files in virtual memory. Everything in tmpfs is temporary in the sense that no files will be created on your hard drive. If you unmount a tmpfs instance, everything stored therein is lost. This is a good place to put secrets if they are in files, because they will not be written to disk. ↩