Vault Agent as sidecar for F5 AST
Summary
Hashicorp Vault is a popular approach for secret management. We will cover an example using Vault to store BIG-IP passwords and use them with the F5 Application Study Tool (AST).
This part 2 of 2 articles:
What is a sidecar container?
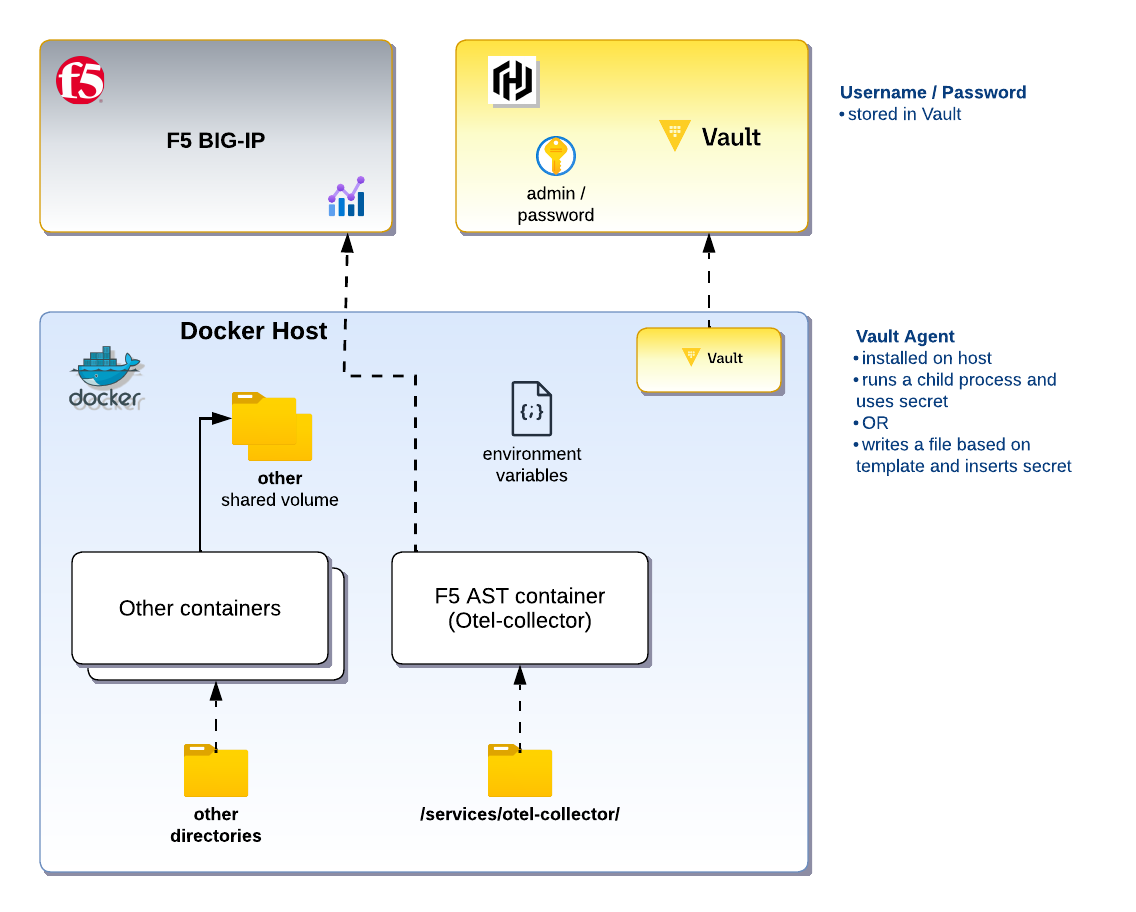
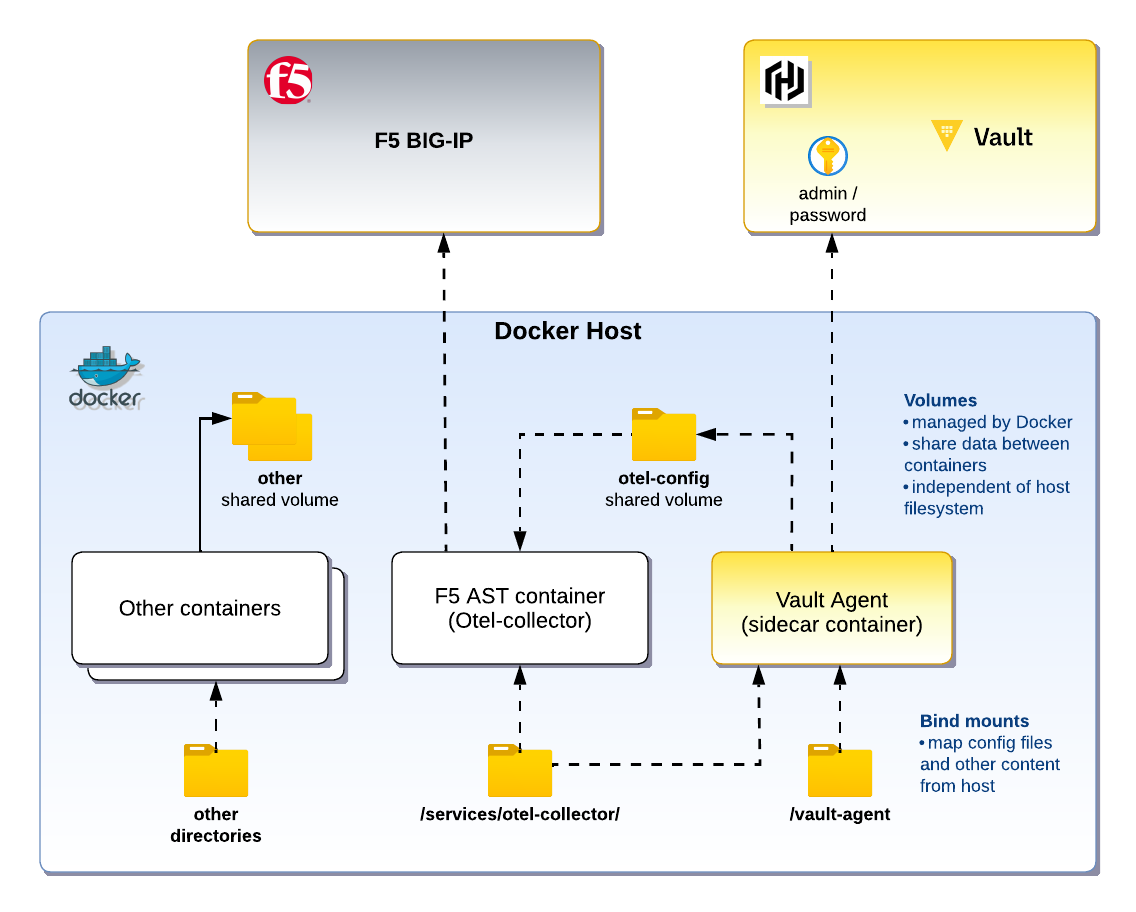
A sidecar container running Vault Agent can retrieve secrets and provide them to other containers. This removes the requirement to run Vault on the Docker Host, allowing the container(s) to run on other servers.
Overview of architecture
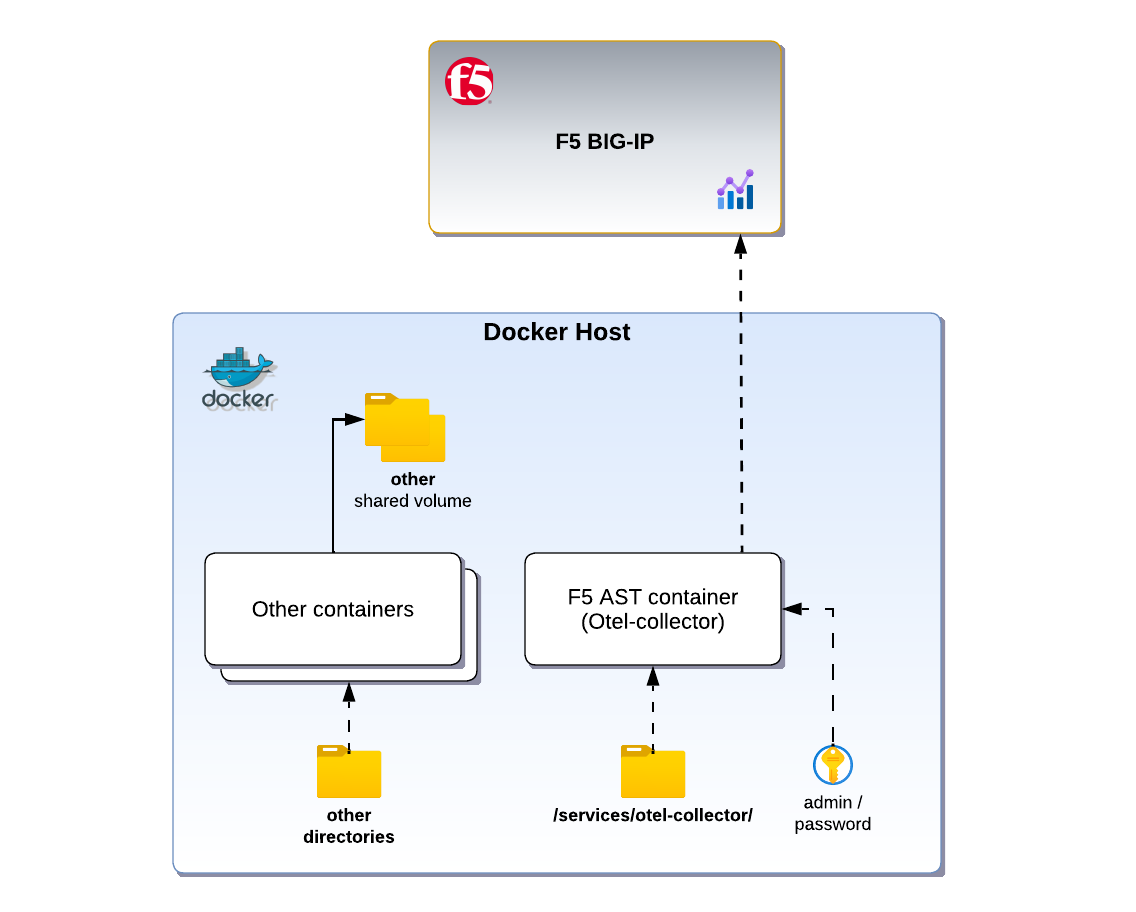
In this example, we’ll follow the official documentation to run F5’s Application Study Tool. Then we will modify our configuration by removing the .env.device-secrets file that contains the passwords for BIG-IP devices. In place of this file, we will pull a secret using a sidecar container running Vault Agent and provide this secret to our application container.
Deploy AST with defaults
Prerequisties
- Hashicorp Vault server, running and accessible, with:
- a secret called bigip_password_1
- an AppRole with access to this secret
- Docker Engine and Docker Compose
Install and configure F5 AST
Follow the official documentation to install the F5 AST.
Once you have configured settings for device defaults and individual devices, you’ll configure device secrets in the file .env.device-secrets. When you run the configuration helper, configuration files created that will be mounted to your containers.
Validate AST with .env.device-secrets
Before we replace environment variables with dynamically-pulled values, run the AST to ensure that you are starting with a working configuration. Typically this means running docker compose up.
After following all default installation steps, my docker-compose.yaml file looks as follows:
version: '3'

volumes:
  prometheus:
  grafana:

services:
  prometheus:
    image: prom/prometheus:v2.54.1
    container_name: prometheus
    restart: unless-stopped
    stop_grace_period: 5m
    volumes:
      - ./services/prometheus/prometheus.yml:/etc/prometheus/prometheus.yml
      - prometheus:/prometheus
    command:
      - '--config.file=/etc/prometheus/prometheus.yml'
      - '--storage.tsdb.path=/prometheus'
      - '--web.console.libraries=/etc/prometheus/console_libraries'
      - '--web.console.templates=/etc/prometheus/consoles'
      - '--web.enable-lifecycle'
      - '--enable-feature=otlp-write-receiver'
      - '--storage.tsdb.retention.time=1y'
    ports:
      - 9090:9090
    networks:
      - 7lc_network

  otel-collector:
    image: ghcr.io/f5devcentral/application-study-tool/otel_custom_collector:v0.9.3
    restart: unless-stopped
    volumes:
      - ./services/otel_collector:/etc/otel-collector-config
    command:
      - "--config=/etc/otel-collector-config/defaults/bigip-scraper-config.yaml"
    env_file:
      - ".env"
      - ".env.device-secrets"
    networks:
      - 7lc_network

  grafana:
    image: grafana/grafana:11.2.0
    container_name: grafana
    restart: unless-stopped
    ports:
      - 3000:3000
    volumes:
      - grafana:/var/lib/grafana
      - ./services/grafana/provisioning/:/etc/grafana/provisioning
    env_file: ".env"
    networks:
      - 7lc_network

networks:
  7lc_network:
Use a sidecar container for secret injection
Now let’s move away from using .env.device-secrets and use a sidecar container to inject these secrets. We will add, remove, or edit the following files:
application-study-tool/
├── docker-compose.yml                      #edit
├── .env.device-secrets                     #remove
└── vault-agent/                            #add
    ├── vault-agent-config.hcl              #add
    ├── role_id                             #add
    └── secret_id                           #add
└── services/
    └── otel-collector/
        └── defaults/
            └── bigip-scraper-config.yaml   #edit
Add Vault Agent container
Let’s add a sidecar container who’s only job is simple: pull a secret from Vault and update the original receivers.yaml file with a password.
Create config files for vault agent sidecar
- add a directory called
vault-agent - add a file
vault-agent/role_idand populate with your Vault’s approle role_id - add a file
vault-agent/secret_idand populate with your Vault’s approle secret_id - add a file
vault-agent/vault-agent-config.hclwith the following content:
exit_after_auth = false
pid_file = "/tmp/vault-agent.pid"

vault {
  tls_skip_verify = true
  retry {
    num_retries = 5
  }
}

auto_auth {
  method "approle" {
    mount_path = "auth/approle"
    config = {
      role_id_file_path = "/etc/vault/role_id"
      secret_id_file_path = "/etc/vault/secret_id"
    }
  }

  sink "file" {
    config = {
      path = "/tmp/token"
    }
  }
}

env_template "BIGIP_PASSWORD_1" {
   contents             = "{{ with secret \"secret/bigip_password_1/config\" }}{{ .Data.data.password }}{{ end }}"
   error_on_missing_key = true
}

exec {
  command                   = ["apk add yq && yq eval '.bigip/1.password = $BIGIP_PASSWORD_1' /otel-config/receivers_template.yaml > /otel-config/receivers.yaml && sleep 300"]
  restart_on_secret_changes = "always"
  restart_stop_signal       = "SIGTERM"
}
Update docker-compose.yaml
Add the following lines within the volumes and services section of your docker-compose.yaml file. Notice the $VAULT_ADDR env var and edit to point to your Vault server.
volumes:      #this line is already present
  prometheus: #this line is already present
  grafana:    #this line is already present
  otel-config:
...

services: #this line is already present
  vault_agent:
    image: hashicorp/vault:1.15
    environment:
      VAULT_ADDR: "https://172.20.100.102:8200"
    container_name: vault_agent
    volumes:
      - ./vault-agent/:/etc/vault
      - ./vault-agent/role_id:/etc/vault/role_id:ro
      - ./vault-agent/secret_id:/etc/vault/secret_id:ro
      - otel-config:/otel-config
      - ./services/otel_collector/receivers.yaml:/otel-config/receivers_template.yaml
    entrypoint: ["vault", "agent", "-config=/etc/vault/vault-agent-config.hcl"]

...
Now within the same docker-compose.yaml file, make careful updates to the otel-collector container:
- remove the reference to
.env.device-secrets - mount the shared volume
otel-config - add a
depends_oncondition to ensure vault agent container completes before AST starts
  otel-collector:
     depends_on: #<---- this line has been added
       vault_agent: #<---- this line has been added
         condition: service_completed_successfully #<---- this line has been added
    image: ghcr.io/f5devcentral/application-study-tool/otel_custom_collector:v0.9.3
    restart: unless-stopped
    volumes:
      - ./services/otel_collector:/etc/otel-collector-config
      - otel-config:/otel-config #<---- this line has been added
    command:
      - "--config=/etc/otel-collector-config/defaults/bigip-scraper-config.yaml"
    env_file:
      - ".env"
      #- ".env.device-secrets" #<---- this line can now be deleted
    networks:
      - 7lc_network
Manually update your AST config file
One of the config files that is mounted to your AST container is on the host at /services/otel-collector/defaults/bigip-scraper-config.yaml. This file begins with the following line:
receivers: ${file:/etc/otel-collector-config/receivers.yaml}
...
Let’s update bigip-scraper-config.yaml to reference a new file that created by our sidecar container:
receivers: ${file:/otel-config/receivers.yaml}
...
Validate AST with sidecar-injected secret
Run docker-compose up and what you should find is:
- the vault_agent container starts first and
- authenticates to existing Vault server
- retrieves secret (configured in vault agent config file)
- installs the tool yq1
- creates a file based on the otel configuration file that is updated with the password
- stores this file on a shared volume
- the otel-collector container starts after this, and
- the config file references a newly-created
receivers.yamlfile that has been created by the vault_agent container
- the config file references a newly-created
Conclusion
A sidecar container approach is simple: one container pulls a secret, and provides it to another running container either through a network connection or a shared mounted file. If you have the ability, you can add logic to the application container (the container that receives the secret) to run a script, set a variable, etc, in order to use this secret. In the case of the otel-collector container, we cannot run arbitrary scripts, so we have edited the main configuration file and supplied our own nested configuration file created by our sidecar container.
As you can see, a simpler approach to this problem would be running Vault Agent on the Docker Host, and a Kubernetes deployment also makes the secure management of environment variables easier. But the sidecar approach can also work!
Thanks for reading! Please reach out if you have any questions or feedback.
-
For this demo I have run
apk add yqas a command in the vault_agent container, but we could also mount this binary or install in customized container image, or output secret to a file and use a script to merge the existing config file with the secret password. ↩