Using ExternalDNS with F5 CIS to Automate DNS on Non-F5 DNS Servers

Overview
F5 Container Ingress Services (CIS) is a powerful way to manage BIG-IP configuration directly from Kubernetes. Using CIS Custom Resource Definitions (CRDs) like VirtualServer and TransportServer, you can define rich traffic management policies in native Kubernetes manifests and have CIS automatically create and update Virtual IPs (VIPs) on BIG-IP.
One common question that comes up: “What if I want DNS records created automatically when a VirtualServer comes up, but I’m not using F5 DNS?”
This article answers exactly that question. We’ll walk through how to combine CIS VirtualServer resources with the community project ExternalDNS to automatically register DNS records on external DNS providers like AWS Route 53, Infoblox, CoreDNS, Azure DNS, and others — all without touching a zone file by hand.
Background: How DNS Automation Typically Works in Kubernetes
Before diving into the solution, it’s worth grounding ourselves in how DNS automation normally works in Kubernetes.
The Standard Pattern: Services of Type LoadBalancer
The most common pattern is:
- You create a
Serviceof typeLoadBalancer. - A cloud controller (or a bare-metal equivalent like MetalLB) assigns an external IP and updates the
status.loadBalancer.ingressfield of the Service object. - ExternalDNS watches for Services of type
LoadBalancerwith specific annotations, reads the IP from thestatusfield, and creates a DNS A record on your external DNS server.
This is clean, well-understood, and widely supported. ExternalDNS can also watch Ingress objects or Services of type ClusterIP and NodePort, but the LoadBalancer pattern is by far the most common integration point.
Where F5 CIS Fits In
CIS supports creating VIPs on BIG-IP in multiple ways:
-
VirtualServer / TransportServer CRDs — Most customers prefer to use VS or TS CRDs because they expose richer BIG-IP capabilities: iRules, custom persistence profiles, health monitors, TLS termination policies, and more. This is where the DNS automation story gets more nuanced and is the focus of this article.
-
Service of type LoadBalancer — CIS watches for Services of type
LoadBalancer. Typically an IPAM controller or a custom annotation will be used to configure an IP address. CIS allocates a VIP on BIG-IP, and updates the Service’sstatus.loadBalancer.ingressfield with that IP. This is not the focus of this article. -
Other — CIS can also use
IngressorConfigMapresources, but these are out of scope for this article.
The Gap: F5 CRDs and Non-F5 DNS
CIS does include its own ExternalDNS CRD (not to be confused with the community project of the same name). However, F5’s built-in ExternalDNS CRD only supports F5 DNS (BIG-IP DNS / GTM). If you’re using Route 53, Infoblox, PowerDNS, or any other DNS provider, you need a different approach.
That’s where the community ExternalDNS project comes in.
The Solution: VirtualServer + Service of Type LoadBalancer + ExternalDNS
The trick is straightforward once you see it:
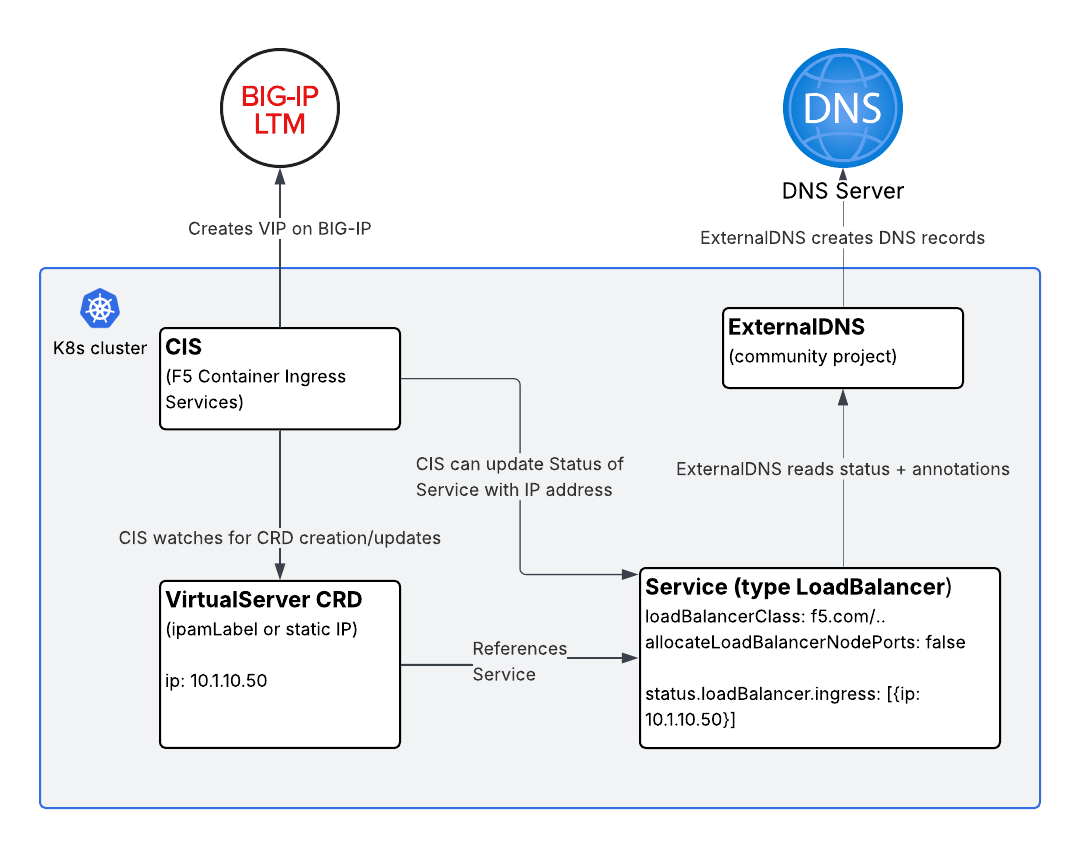
CIS can manage a VIP on BIG-IP via a
VirtualServerCRD while simultaneously updating thestatusfield of aServiceof typeLoadBalancer. ExternalDNS then reads thatstatusfield and creates DNS records.
Here’s the flow:
1
2
3
4
5
6
7
8
9
10
11
12
13
14
VirtualServer CRD
      │
      │  references pool members via
      ▼
Service (type: LoadBalancer)
      │
      │  CIS updates status.loadBalancer.ingress
      │  with the VIP IP address
      ▼
ExternalDNS watches Service status
      │
      │  creates/updates DNS record
      ▼
External DNS Server (Route 53, Infoblox, etc.)
Let’s walk through the manifests.
Step-by-Step Walkthrough
Step 1: Deploy Your Application
A standard Deployment — nothing special here.
1
2
3
4
5
6
7
8
9
10
11
12
13
14
15
16
17
18
19
20
apiVersion: apps/v1
kind: Deployment
metadata:
  name: my-app
  namespace: my-namespace
spec:
  replicas: 2
  selector:
    matchLabels:
      app: my-app
  template:
    metadata:
      labels:
        app: my-app
    spec:
      containers:
        - name: my-app
          image: my-app:latest
          ports:
            - containerPort: 8080
Step 2: Create the Service of Type LoadBalancer
This Service is the linchpin of the whole solution. It serves three purposes:
- It acts as a target for the CIS
VirtualServerpool (either via NodePort or directly to pod IPs in cluster mode). - CIS updates its
status.loadBalancer.ingressfield with the BIG-IP VIP address. - ExternalDNS reads its
statusand annotations to create a DNS record.
1
2
3
4
5
6
7
8
9
10
11
12
13
14
15
16
17
18
19
20
21
22
apiVersion: v1
kind: Service
metadata:
  name: my-app-svc
  namespace: my-namespace
  annotations:
    # ExternalDNS annotation — tells ExternalDNS what hostname to register
    external-dns.alpha.kubernetes.io/hostname: myapp.example.com
    # Optional: set a custom TTL
    external-dns.alpha.kubernetes.io/ttl: "60"
spec:
  selector:
    app: my-app
  ports:
    - port: 80
      targetPort: 8080
      protocol: TCP
  type: LoadBalancer
  # Prevent other LB controllers from acting on this Service
  loadBalancerClass: f5.com/bigip
  # Do not allocate NodePort endpoints — more on this below
  allocateLoadBalancerNodePorts: false
Two fields here deserve extra explanation.
loadBalancerClass: f5.com/bigip
In a typical cluster, multiple controllers may be watching for Services of type LoadBalancer — MetalLB, the cloud provider controller, etc. If you’re using CIS VirtualServer CRDs to manage the VIP (rather than having CIS act directly as a LoadBalancer controller for this Service), you likely don’t want any of those other controllers touching this Service.
Setting loadBalancerClass to a value that no other running controller claims means this Service will be ignored by all LB controllers except the one that explicitly handles that class. In this pattern, no controller is assigning the VIP from the Service side — CIS does it via the VirtualServer CRD and writes back the IP into the status field programmatically.
Note: The exact value of
loadBalancerClassdepends on your environment. The key goal is to prevent unintended controllers from assigning IPs or creating cloud load balancers for this Service.
allocateLoadBalancerNodePorts: false
By default, LoadBalancer Services in Kubernetes allocate NodePort endpoints. This means traffic could reach your pods directly via <NodeIP>:<NodePort> — bypassing BIG-IP entirely, bypassing your security policies, and bypassing your iRules.
Setting allocateLoadBalancerNodePorts: false prevents this. The Service effectively behaves like a ClusterIP service in terms of access — the only way to reach it from outside the cluster is via the BIG-IP VIP. This is the right posture when:
- Your CIS deployment uses
--pool-member-type=cluster, sending traffic directly to pod IPs via the BIG-IP’s overlay network (VXLAN or GENEVE). - You want BIG-IP to be the sole external entry point for policy enforcement.
Step 3: Create the VirtualServer CRD
Now we define the VirtualServer. Note how it references the Service by name in the pool configuration:
1
2
3
4
5
6
7
8
9
10
11
12
13
14
15
16
17
18
19
20
21
apiVersion: cis.f5.com/v1
kind: VirtualServer
metadata:
  name: my-app-vs
  namespace: my-namespace
  labels:
    f5cr: "true"
spec:
  host: myapp.example.com
  ipamLabel: prod          # Optional: use F5 IPAM Controller for IP allocation
  # virtualServerAddress: "10.1.10.50"  # Or specify IP directly
  pools:
    - path: /
      service: my-app-svc
      servicePort: 80
      monitor:
        type: http
        send: "GET / HTTP/1.1\r\nHost: myapp.example.com\r\n\r\n"
        recv: ""
        interval: 10
        timeout: 10
When CIS processes this VirtualServer, it:
- Creates a VIP on BIG-IP (using either the IP you specified in
virtualServerAddressor one allocated by the F5 IPAM Controller ifipamLabelis used). - Configures the BIG-IP pool with the backends from
my-app-svc. - Writes the VIP IP address back into
my-app-svc’sstatus.loadBalancer.ingressfield.
That last step is what makes the whole chain work.
IP Address: Specify Directly or Use F5 IPAM Controller
You have two options for IP allocation:
Option A — Specify the IP directly in the VirtualServer manifest:
1
2
spec:
  virtualServerAddress: "10.1.10.50"
This is simple and predictable. Good for static, well-planned deployments.
Option B — Use the F5 IPAM Controller:
1
2
spec:
  ipamLabel: prod
The F5 IPAM Controller watches for CIS resources with ipamLabel annotations and allocates IPs from a configured range. CIS then picks up the allocated IP automatically. This is ideal when you want full automation without managing IP addresses in YAML files.
Step 4: Verify CIS Updates the Service Status
After CIS processes the VirtualServer, check the Service:
1
kubectl get svc my-app-svc -n my-namespace -o jsonpath='{.status.loadBalancer.ingress}'
You should see output like:
1
[{"ip":"10.1.10.50"}]
This is the IP that ExternalDNS will use to create the DNS record.
Step 5: ExternalDNS Does Its Job
With ExternalDNS deployed and configured for your DNS provider (Route 53, Infoblox, etc.), it will:
- Discover
my-app-svcbecause it’s of typeLoadBalancerwith anexternal-dns.alpha.kubernetes.io/hostnameannotation. - Read
10.1.10.50fromstatus.loadBalancer.ingress. - Create an A record:
myapp.example.com → 10.1.10.50.
ExternalDNS handles the rest automatically, including updates if the IP changes.
A minimal ExternalDNS deployment for Route 53 would look like:
1
2
3
4
5
6
7
8
9
10
11
12
13
14
15
16
17
18
19
20
21
22
23
24
25
26
apiVersion: apps/v1
kind: Deployment
metadata:
  name: external-dns
  namespace: external-dns
spec:
  replicas: 1
  selector:
    matchLabels:
      app: external-dns
  template:
    metadata:
      labels:
        app: external-dns
    spec:
      serviceAccountName: external-dns
      containers:
        - name: external-dns
          image: registry.k8s.io/external-dns/external-dns:v0.14.0
          args:
            - --source=service
            - --domain-filter=example.com
            - --provider=aws
            - --aws-zone-type=public
            - --registry=txt
            - --txt-owner-id=my-cluster
Refer to the ExternalDNS documentation for provider-specific configuration (IAM roles for Route 53, credentials for Infoblox, etc.).
Putting It All Together: Summary of the Architecture
Key Considerations and Design Choices
When to Use This Pattern vs. CIS as a LoadBalancer Controller
CIS can act directly as a LoadBalancer controller — watching Services of type LoadBalancer and creating VIPs on BIG-IP without any VirtualServer CRD involvement. If that’s sufficient for your needs, it’s simpler. ExternalDNS works with that mode natively, since CIS updates status.loadBalancer.ingress in both cases.
Use the VirtualServer CRD approach when you need:
- Custom iRules or iApps on the VIP
- Advanced persistence profiles
- Fine-grained TLS termination control
- Traffic splitting or A/B routing policies
- Any BIG-IP capability that doesn’t map directly to Kubernetes Service semantics
allocateLoadBalancerNodePorts: false — When It Applies
This setting is appropriate when your CIS deployment uses --pool-member-type=cluster. In cluster mode, BIG-IP sends traffic directly to pod IPs, not through NodePort endpoints. Disabling NodePort allocation:
- Prevents back-door access to your application via
<NodeIP>:<NodePort>. - Reduces iptables rule sprawl on your nodes.
- Aligns with a clean security boundary where BIG-IP is the sole ingress.
If your CIS deployment uses --pool-member-type=nodeport, you should not set allocateLoadBalancerNodePorts: false, as CIS will need those NodePorts to forward traffic.
F5 IPAM Controller Integration
The F5 IPAM Controller pairs particularly well with this pattern. Rather than managing VIP IP addresses in your VirtualServer manifests, IPAM handles allocation from a configured pool. This means:
- Platform teams manage IP ranges in the IPAM controller config.
- Application teams simply specify an
ipamLabelin theirVirtualServermanifest. - CIS picks up the IPAM-assigned IP and writes it to the Service
statusautomatically.
The ExternalDNS chain remains identical regardless of whether the IP comes from IPAM or is statically assigned.
Frequently Asked Questions
Q: Can I use this pattern with TransportServer CRDs instead of VirtualServer?
Yes. CIS similarly updates the status of a referenced Service when using TransportServer. The same approach applies.
Q: What if I want ExternalDNS to also create a CNAME instead of an A record?
Use the external-dns.alpha.kubernetes.io/target annotation on the Service to override the IP with a hostname, causing ExternalDNS to create a CNAME. Refer to ExternalDNS documentation for specifics.
Q: Can I use multiple hostnames for the same VirtualServer?
Add multiple external-dns.alpha.kubernetes.io/hostname annotations (comma-separated values are supported by ExternalDNS) or create additional Services pointing to the same pods.
Conclusion
Combining F5 CIS VirtualServer CRDs with the community ExternalDNS project gives you the best of both worlds: rich BIG-IP traffic management via CIS, and flexible, provider-agnostic DNS automation via ExternalDNS.
The core insight is simple — CIS writes the BIG-IP VIP IP address back into the Kubernetes Service status field, and ExternalDNS reads from that same field. By using loadBalancerClass and allocateLoadBalancerNodePorts: false, you ensure the Service is a clean “status carrier” that doesn’t accidentally expose your application through unintended paths.
Whether you assign VIP IPs statically in your manifests or use the F5 IPAM Controller for full automation, this pattern integrates naturally into any Kubernetes-native GitOps workflow.