Google LB and PROXY protocol demo using NGINX
Recently a customer asked about their options in Google cloud with global load balancers. This is a brief overview of their requirements, and a small demo showcasing the power of PROXY protocol.
Customer requirements:
- We have F5 VM’s running in Google Cloud, providing WAF services.
- We want a global load balancer
- i.e, we want a public IP address advertised via Anycast from each of Google’s front end locations.
- We want to know the true source IP of clients when they reach our WAF.
- We do not want to use an Application Load Balancer in Google
- i.e., we do not want to perform TLS decryption within a Google LB for HTTP/HTTPS load balancing.
- therefore we cannot use X-Forwarded-For headers to preserve true source IP
- Additionally, we’d like to use Cloud Armor. Please let us know how we can add on a CDN/DDoS/WAF provider.
Which load balancer type fits best?
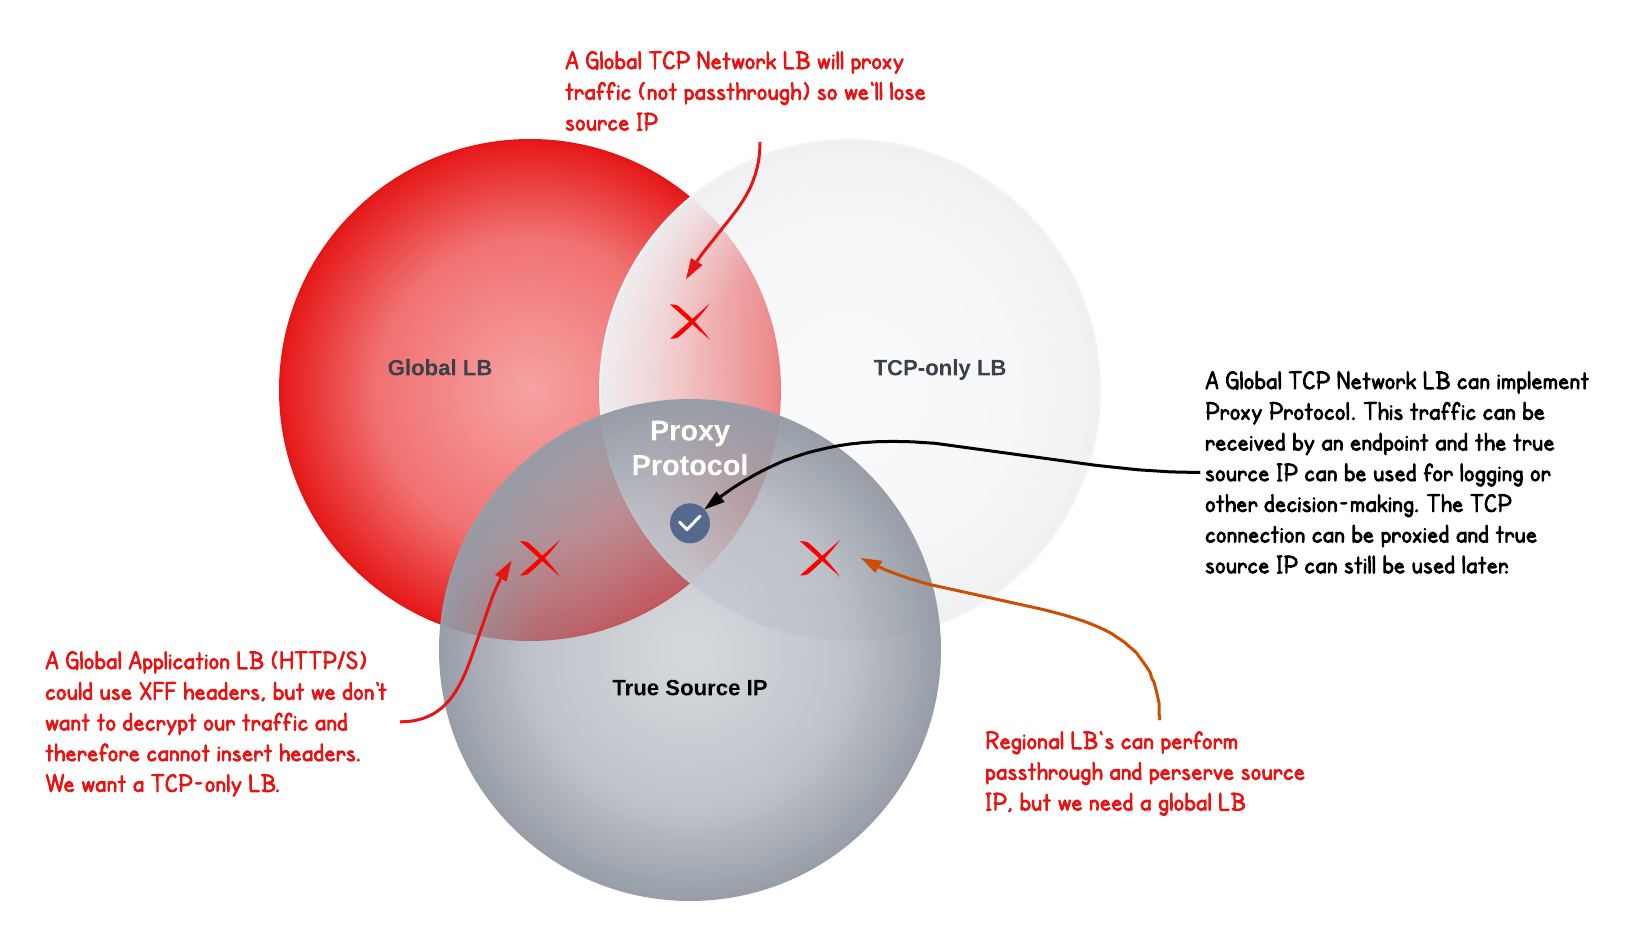
This guide outlines our options for Google LB’s. Because our requirements include global, TCP-only load balancing, we will choose the highlighted LB type of “Global external proxy Network Load Balancer”.

Proxy vs Passthrough
Notice that global LB’s proxy traffic. They do not preserve source IP address as a passthrough LB does. This is because global IP addresses are advertised from globally-distributed front end locations.
Proxying from these locations allows traffic symmetry, but Source NAT causes loss of the original client IP address. Fortunately, we can overcome this with PROXY protocol.
PROXY protocol support with Google load balancers
Google’s TCP LB documentation outlines our challenge and solution:
By default, the target proxy does not preserve the original client IP address and port information. You can preserve this information by enabling the PROXY protocol on the target proxy.
Without PROXY protocol support, we could only meet 2 of 3 core requirements with any given load balancer type. PROXY protocol allows us to meet all 3 simultaneously.

Setting up our environment in Google
The script below configures a global TCP proxy network load balancer and associated objects. It is assumed that a VPC network, subnet, and VM instances exist already.
This script assumes the VM’s are F5 BIG-IP devices, although our demo will use Ubuntu VM’s with NGINX installed. Either of these are capable of parsing PROXY protocol.
Receiving PROXY protocol using NGINX
Let’s run NGINX on the VM to which our load balancer points. When proxying traffic, NGINX can append an additional header containing the value of the source IP obtained from PROXY protocol:
1
2
3
4
5
6
7
8
9
10
11
12
13
14
server {
  listen 80 proxy_protocol; # tell NGINX to expect traffic with PROXY protocol
  server_name customer1.my-f5.com;

  location / {
    proxy_pass http://localhost:3000;
    proxy_http_version 1.1;
    proxy_set_header x-nginx-ip $server_addr; # append a header to pass the IP address of the NGINX server
    proxy_set_header x-proxy-protocol-source-ip $proxy_protocol_addr; # append a header to pass the src IP address obtained from PROXY protocol
    proxy_set_header Host $host;
    proxy_set_header X-Real-IP $remote_addr; # append a header to pass the src IP of the connection between Google's front end LB and NGINX
    proxy_cache_bypass $http_upgrade;
  }
}
You might notice that NGINX is proxying to http://localhost:3000. I have a simple NodeJS app to display a page with HTTP headers:
1
2
3
4
5
6
7
8
9
10
11
12
13
14
15
16
17
18
19
20
21
22
23
const express = require('express');
const app = express();
const port = 3000;

// set the view engine to ejs
app.set('view engine', 'ejs');

app.get('/', (req, res) => {
        const proxy_protocol_addr = req.headers['x-proxy-protocol-source-ip'];
        const source_ip_addr = req.headers['x-real-ip'];
        const array_headers = JSON.stringify(req.headers, null, 2);
        const nginx_ip_addr = req.headers['x-nginx-ip'];
    res.render('index', {
        proxy_protocol_addr: proxy_protocol_addr,
        source_ip_addr: source_ip_addr,
        array_headers: array_headers,
        nginx_ip_addr: nginx_ip_addr
    });
})
app.listen(port, () => {
  console.log('Server is listenting on port 3000');
})
For completeness, NodeJS is using the EJS template engine to build our page. The file views/index.ejs is here:
1
2
3
4
5
6
7
8
9
10
11
12
13
14
15
16
17
18
<!DOCTYPE html>
<html lang="en">
<head>
        <meta charset="UTF-8">
        <meta name="viewport" content="width=device-width, initial-scale-1">
        <title>Demo App</title>
</head>
<body class="container">
<main>
        <h2>Hello World!</h2>
        <p>True source IP (the value of <code>$proxy_protocol_addr</code>) is <b><%= typeof proxy_protocol_addr != 'undefined' ? proxy_protocol_addr : '' %></b></p>
        <p>IP address that NGINX recieved the connection from (the value of <code>$remote_addr</code>) is <b><%= typeof source_ip_addr != 'undefined' ? source_ip_addr : '' %> </b></p>
        <p>IP address that NGINX is running on (the value of <code>$server_addr</code>) is <b><%= typeof nginx_ip_addr != 'undefined' ? nginx_ip_addr : '' %></b><p>
        <h3>Request Headers at the app:</h3>
        <pre><%= typeof array_headers != 'undefined' ? array_headers : '' %></pre>
</main>
</body>
</html>
Cloud Armor
Cloud Armor is an easy add-on when using Google load balancers. If required, an admin can:
- Create a Cloud Armor security policy
- Add rules (for example, rate limiting) to this policy
- Attach the policy to a TCP load balancer In this way “edge protection” is applied to your Google workloads with little effort.
Our end result
This small demo app shows that true source IP can be known to an application running on Google VM’s when using the Global TCP Network Load Balancer. We’ve achieved this using PROXY protocol and NGINX. We’ve used NodeJS to display a web page with proxied header values.

Thanks for reading. Please reach out with any questions!