Introduction to LiteLLM
Introduction to LiteLLM
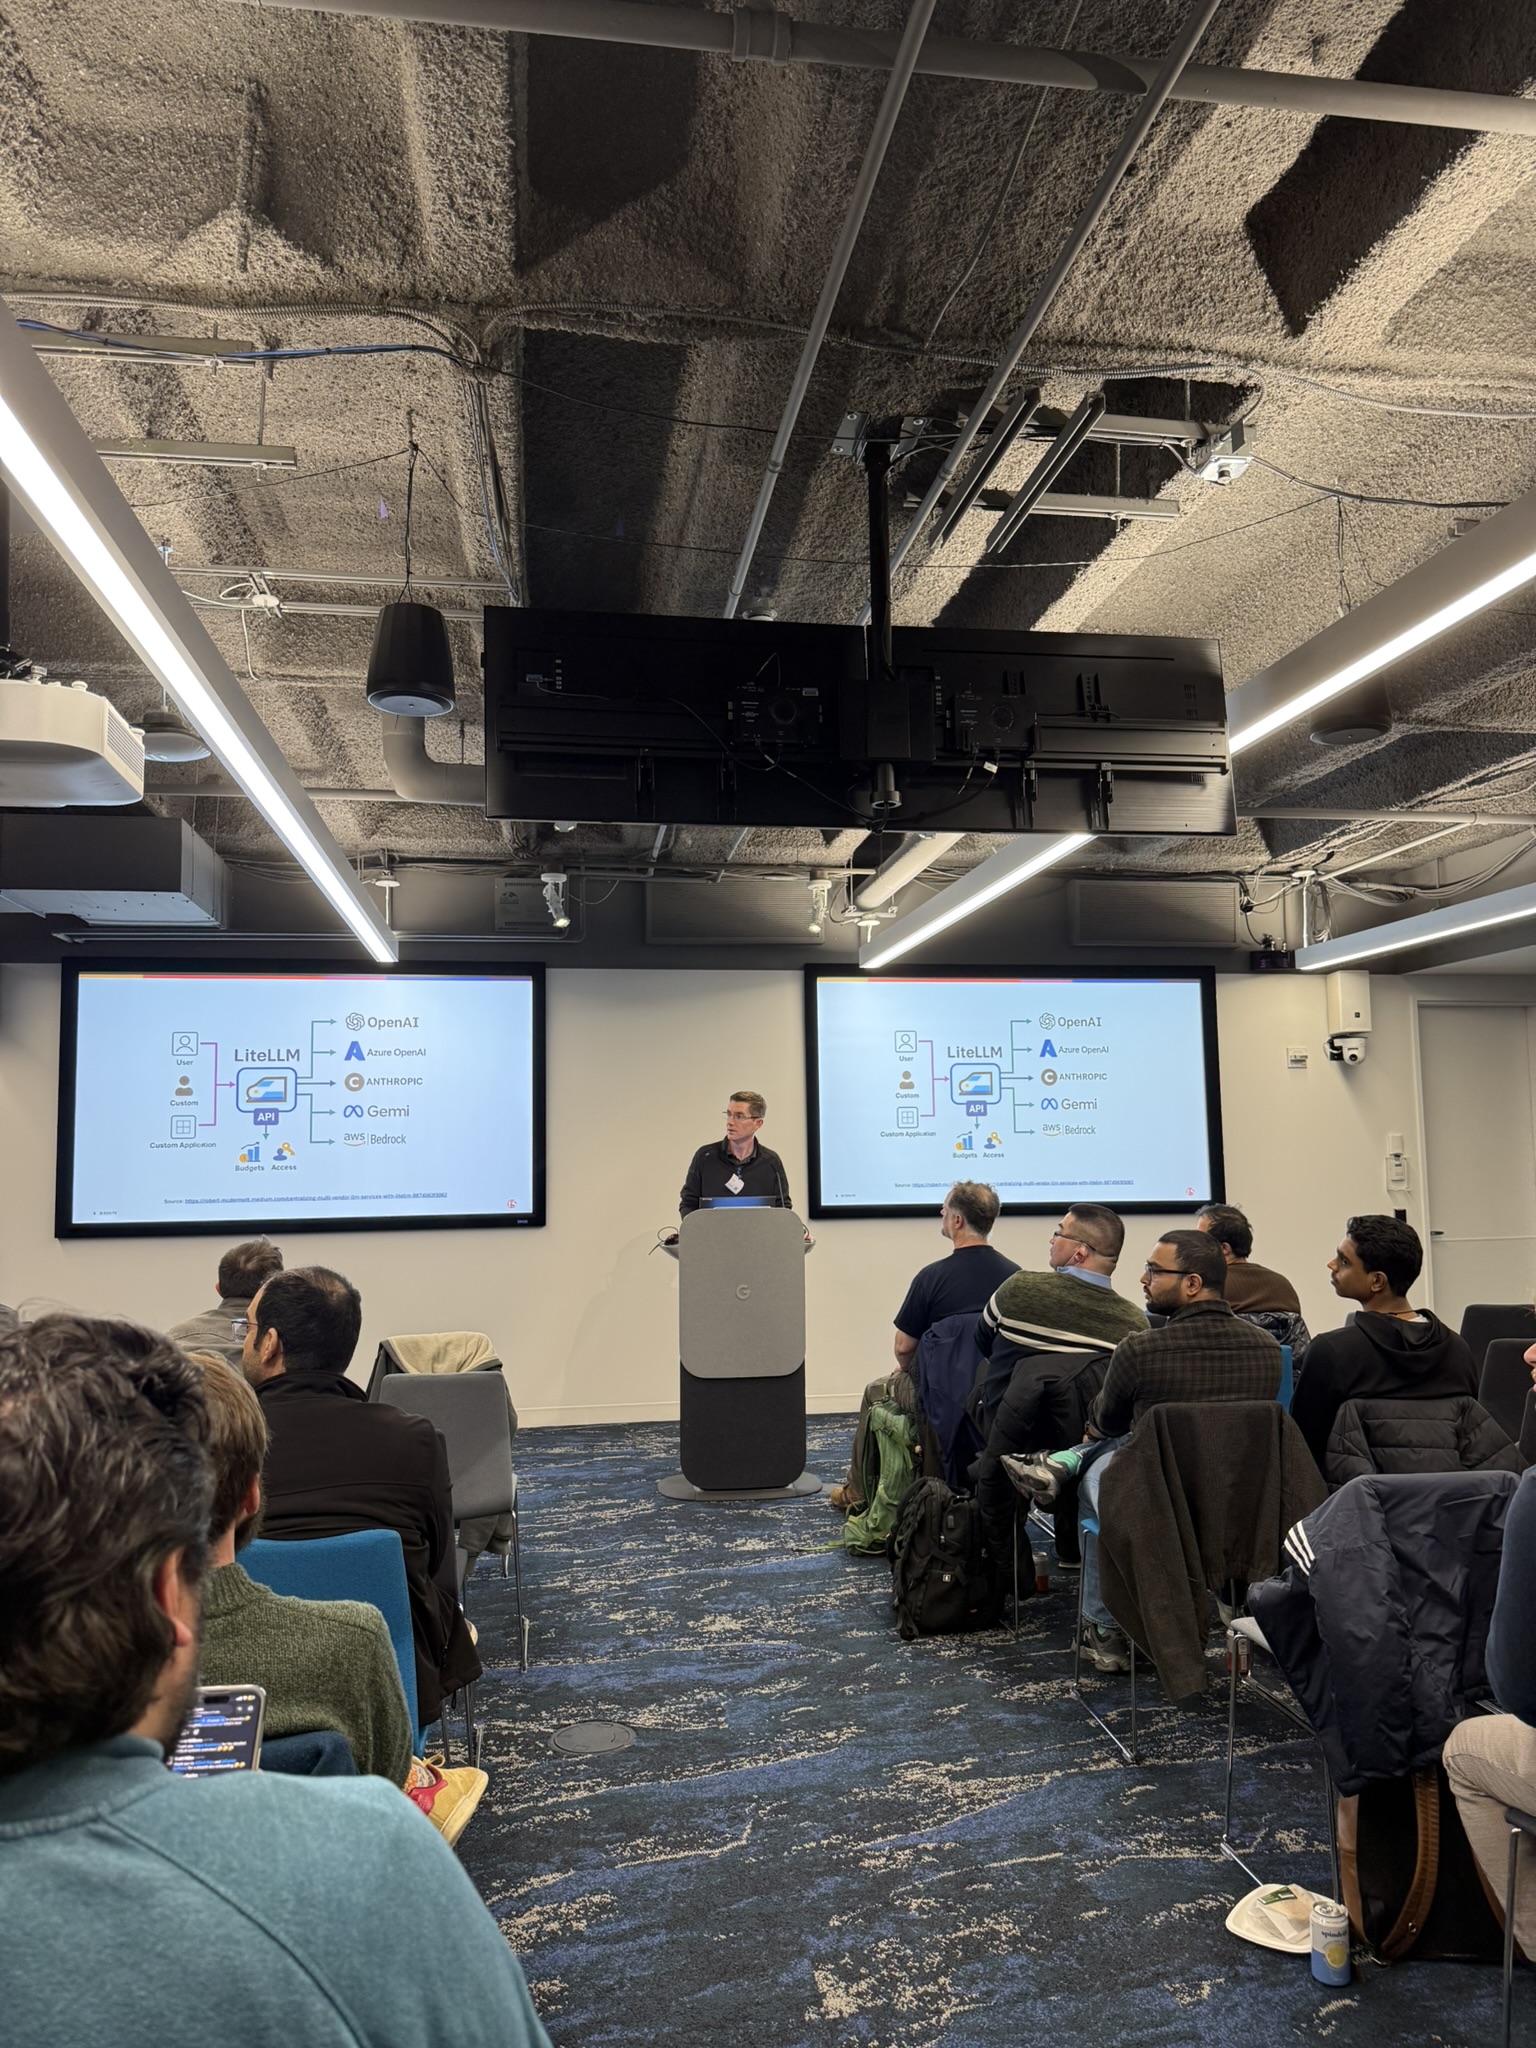
This post is based on a talk I gave at the Boston Kubernetes Meetup on Tue Apr 7, 2026. The goal was to introduce LiteLLM to the group and show a progressive demo — from a local Python install all the way to Kubernetes. This post is my write-up of that content.
Overview
If you’ve been building anything with LLMs recently, you’ve probably noticed that every provider has a different API. OpenAI looks one way, Anthropic looks another, Gemini is different again. Switching models means rewriting your API calls. Testing two providers side-by-side means maintaining two different integrations. It gets messy fast.
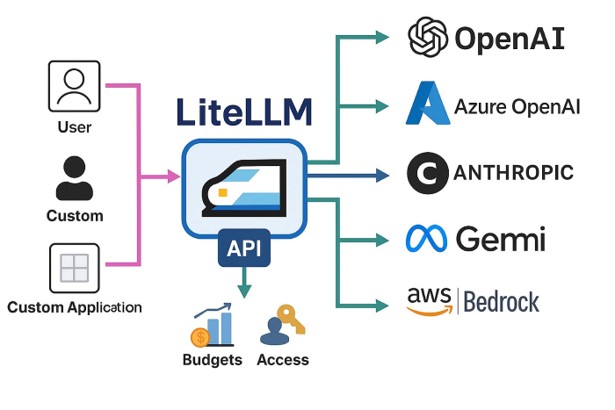
LiteLLM is the answer to this problem. It gives you a single OpenAI-compatible interface for 100+ models and providers. You talk to LiteLLM, and LiteLLM figures out how to talk to whoever is behind it.
But LiteLLM is more than just a translation layer. Put it in your architecture as a proxy and you now have a central point where you can enforce policies, track costs, manage API keys, set rate limits, and observe everything that’s happening across your AI workloads.
What is LiteLLM?
From the project itself: LiteLLM lets you call all LLM APIs (Azure, Gemini, Anthropic, and more) using the OpenAI format. It translates inputs, standardizes exceptions, and guarantees consistent output format for completion() and embedding() calls. It does three things really well:
- Consistent I/O: Removes the need for provider-specific if/else logic in your application code.
- Reliable: Extensively tested with 50+ test cases and used in production environments.
- Observable: Native integrations with Sentry, PostHog, Helicone, Prometheus, Langfuse, and others.
Two ways to use LiteLLM
Before jumping into the demo, it’s worth understanding the two distinct modes.
As a Python SDK
Import LiteLLM directly into your Python code. It’s a drop-in replacement for the OpenAI Python client and works similarly to how other frameworks like LangChain are used.
1
2
3
4
5
6
7
from litellm import completion

response = completion(
    model="anthropic/claude-sonnet-4-20250514",
    messages=[{"role": "user", "content": "Hello!"}]
)
print(response.choices[0].message.content)
Change the model string and nothing else changes. That’s the whole pitch for the SDK. This is the right choice if you’re embedding LiteLLM directly in a Python application.
As a Proxy Server
LiteLLM can run as a standalone HTTP server — an OpenAI-compatible REST API that any application can call, regardless of language. This is what we’ll focus on for the rest of this post.
1
Your App  →  LiteLLM Proxy  →  OpenAI / Anthropic / Gemini / etc.
The proxy exposes standard endpoints like POST /v1/chat/completions and GET /v1/models. Any tool that already knows how to talk to OpenAI — Open WebUI, LangChain, your own app — can point at LiteLLM instead, with zero code changes.
The proxy mode is more interesting from an infrastructure standpoint because it gives you a centralized control plane for all your LLM traffic.
Demo: LiteLLM as a Proxy
I showed a progressive demo at the meetup — starting simple and adding complexity at each step. Here’s the full walkthrough.
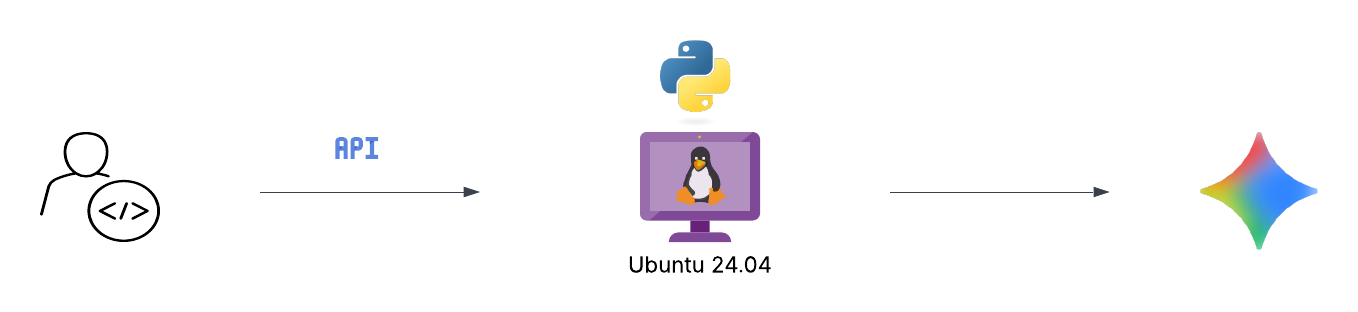
Option 1: Local Python in a virtual environment
This is the simplest possible setup. Good for development and testing.
On Ubuntu 24.04 you’ll hit an “externally managed environment” error if you try to pip install system-wide. This is by design — Ubuntu 24.04 introduced PEP 668 to protect the system Python. Use a virtual environment:
1
2
3
4
5
6
7
8
# Create a virtual environment
python3 -m venv ~/.venv

# Activate it
source ~/.venv/bin/activate

# Install litellm with proxy dependencies
pip install 'litellm[proxy]'
Note: the [proxy] extra is required. The base litellm package doesn’t include the dependencies for the proxy server (FastAPI, uvicorn, websockets, etc.).
Start the proxy with a single model:
1
2
export GEMINI_API_KEY=your-key
litellm --model gemini/gemini-2.5-flash-preview-04-17 --port 4000
That’s it. The proxy is running. Simple enough — but not how you’d run this for anything beyond a quick test.
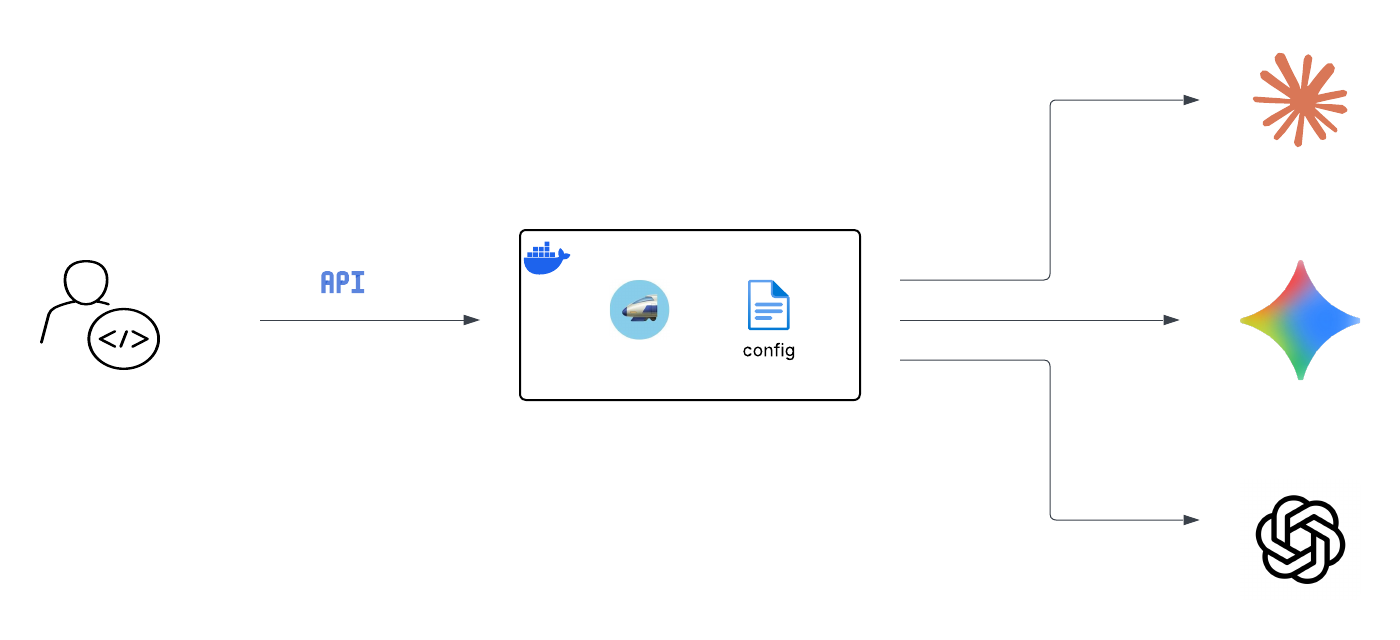
Option 2: Docker with a config file
For anything more serious you want Docker and a config file. The config file is how you manage multiple models, set a master key for authentication, and control routing.
Create litellm_config.yaml:
1
2
3
4
5
6
7
8
9
10
11
12
13
14
15
16
17
18
model_list:
  - model_name: gpt-4o
    litellm_params:
      model: openai/gpt-4o
      api_key: os.environ/OPENAI_API_KEY

  - model_name: claude
    litellm_params:
      model: anthropic/claude-sonnet-4-20250514
      api_key: os.environ/ANTHROPIC_API_KEY

  - model_name: gemini
    litellm_params:
      model: gemini/gemini-2.5-flash-preview-04-17
      api_key: os.environ/GEMINI_API_KEY

general_settings:
  master_key: "sk-xxxx" #change this. It can be anything starting with "sk-".
A few things to note here:
model_nameis the alias your applications use — you choose this, it doesn’t have to match the real underlying model name.os.environ/OPENAI_API_KEYtells LiteLLM to read the key from the environment at runtime, so you never hardcode a secret in the config file.master_keyis what your applications use to authenticate to the proxy. This is separate from — and replaces — your real provider API keys in your application code.
Run it with Docker:
1
2
3
4
5
6
7
8
9
10
11
12
13
export OPENAI_API_KEY=xxxx
export ANTHROPIC_API_KEY=xxxxx
export GEMINI_API_KEY=xxxx

docker run --name litellm-proxy \
  --restart unless-stopped \
  -v $(pwd)/litellm_config.yaml:/app/config.yaml \
  -e OPENAI_API_KEY=$OPENAI_API_KEY \
  -e ANTHROPIC_API_KEY=$ANTHROPIC_API_KEY \
  -e GEMINI_API_KEY=$GEMINI_API_KEY \
  -p 4000:4000 \
  docker.litellm.ai/berriai/litellm:main-stable \
  --config /app/config.yaml
Test it:
1
2
3
4
curl http://localhost:4000/v1/chat/completions \
  -H "Content-Type: application/json" \
  -H "Authorization: Bearer sk-xxxx" \
  -d '{"model": "gemini", "messages": [{"role": "user", "content": "Hello!"}]}'
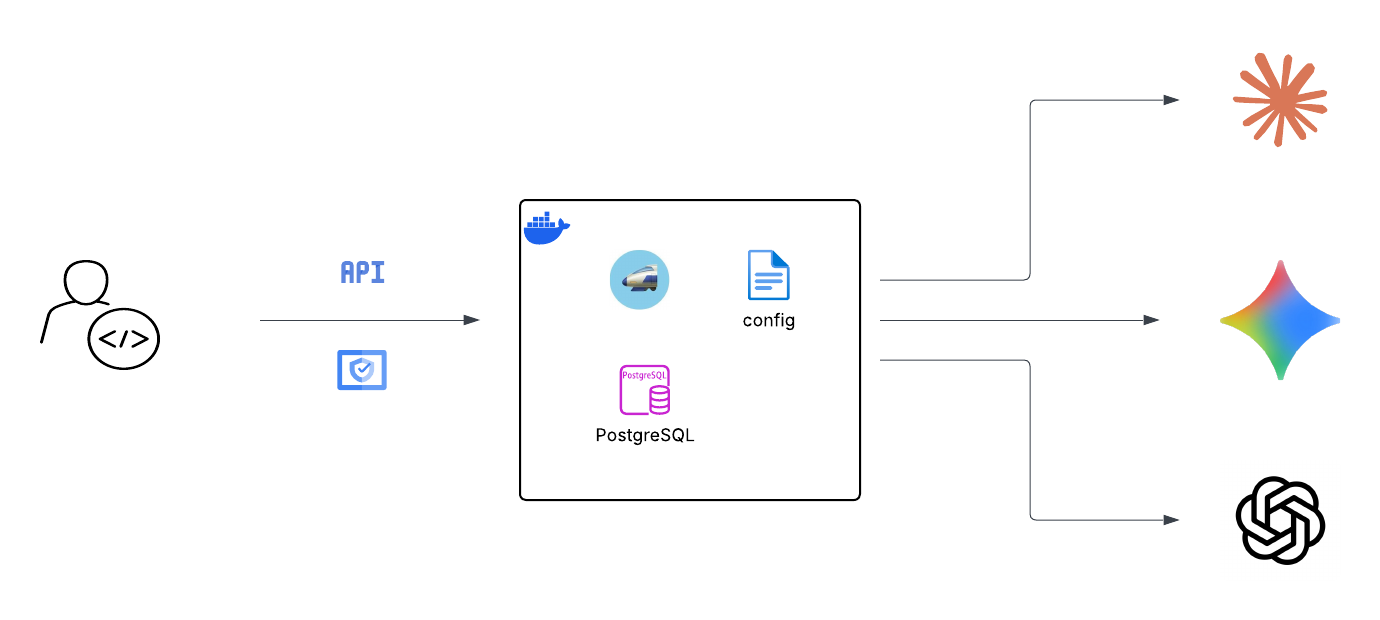
Option 3: Adding a database
The config file handles static startup settings. If you want the admin UI, user management, spend tracking, and virtual key management, you need a Postgres database.
Start a Postgres container:
1
2
3
4
5
docker run --name litellm-postgres \
  -e POSTGRES_DB=litellm \
  -e POSTGRES_USER=litellm \
  -e POSTGRES_PASSWORD=mypassword123 \
  -p 5432:5432 -d postgres
Restart LiteLLM with the database connection and UI credentials:
1
2
3
4
5
6
7
8
9
10
11
12
docker run --name litellm-proxy \
  -v $(pwd)/litellm_config.yaml:/app/config.yaml \
  -e OPENAI_API_KEY=$OPENAI_API_KEY \
  -e ANTHROPIC_API_KEY=$ANTHROPIC_API_KEY \
  -e GEMINI_API_KEY=$GEMINI_API_KEY \
  -e DATABASE_URL="postgresql://litellm:mypassword123@litellm-postgres:5432/litellm" \
  -e UI_USERNAME="admin" \
  -e UI_PASSWORD="admin" \
  --link litellm-postgres:litellm-postgres \
  -p 4000:4000 \
  docker.litellm.ai/berriai/litellm:main-stable \
  --config /app/config.yaml
Once running, the admin UI is at http://[YOUR_IP]:4000/ui. From there you can:
- Create users and teams
- Manage virtual keys with rate limits and spend caps
- View usage and cost per model, per key, per team
- Use the playground to test models directly
- Set up alerting
The general rule of thumb for where things live: structure in config.yaml, secrets in environment variables, runtime data in the database.
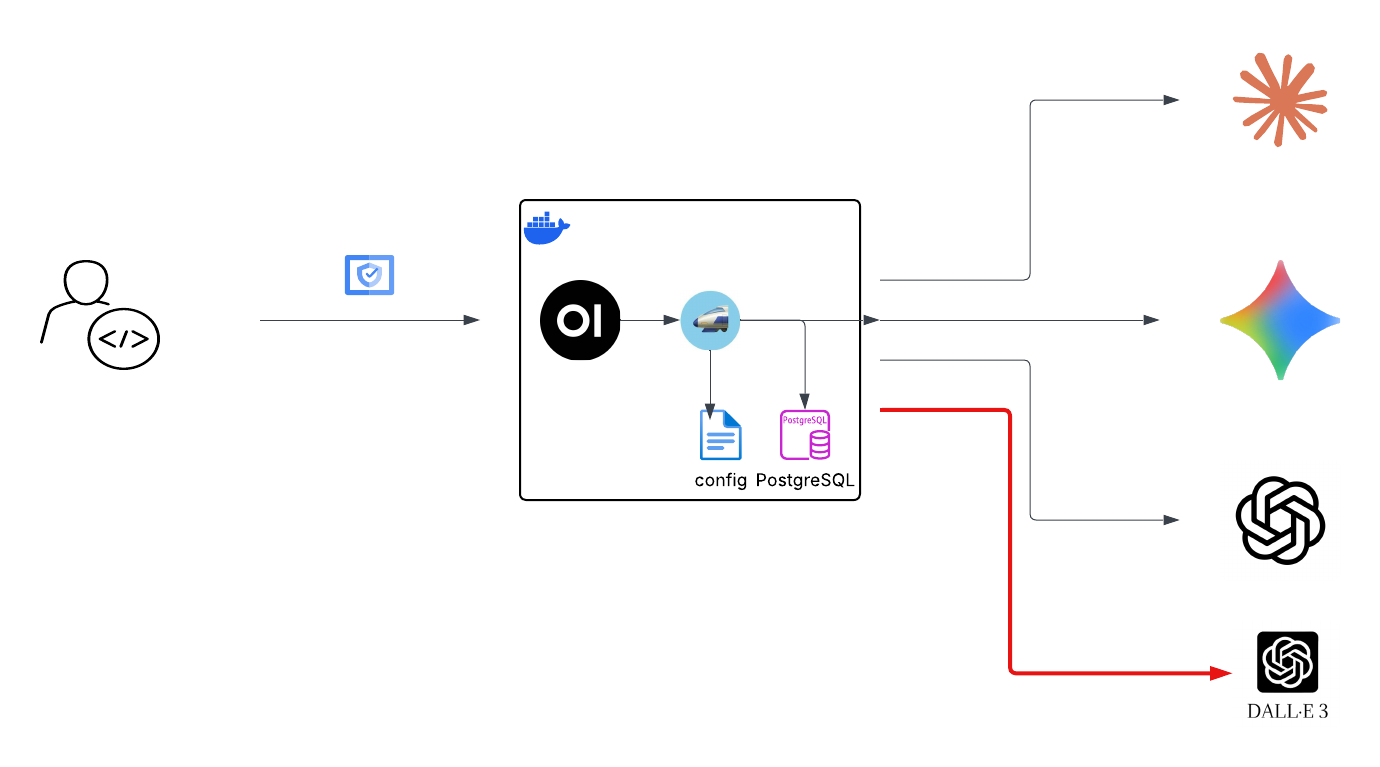
Option 4: Adding Open WebUI
At this point we have a solid LLM proxy. Let’s add a proper chat interface in front of it.
First, add an image generation model to your litellm_config.yaml:
1
2
3
4
5
6
  - model_name: dall-e-3
    litellm_params:
      model: openai/dall-e-3
      api_key: os.environ/OPENAI_API_KEY
    model_info:
      mode: image_generation
Create a Docker network so the containers can reach each other by name:
1
2
docker network create llm-network
docker network connect llm-network litellm-proxy
Run Open WebUI:
1
2
3
4
5
6
7
8
9
10
11
12
docker run --name open-webui \
  --network llm-network \
  -e OPENAI_API_BASE_URL=http://litellm-proxy:4000/v1 \
  -e OPENAI_API_KEY=sk-xxxx \
  -e ENABLE_IMAGE_GENERATION=true \
  -e IMAGE_GENERATION_ENGINE=openai \
  -e IMAGES_OPENAI_API_BASE_URL=http://litellm-proxy:4000/v1 \
  -e IMAGES_OPENAI_API_KEY=sk-xxxx \
  -e IMAGES_OPENAI_API_MODEL=dall-e-3 \
  -e IMAGE_SIZE=1024x1024 \
  -p 3000:8080 \
  ghcr.io/open-webui/open-webui:main
Note http://litellm-proxy:4000/v1 — Docker resolves container names as hostnames within the same network. Open WebUI has no idea it’s talking to LiteLLM rather than OpenAI directly.
Open WebUI is now at http://[YOUR_IP]:3000. You get chat history stored locally, model switching, image generation, and a much nicer interface than curl.
Option 5: Moving to Kubernetes
This is where things get more interesting. Once you’re comfortable with the Docker setup, moving to K8s is a natural next step. You get high availability, rolling updates, better secret management, and proper scaling. Here’s what the migration involves:
- Config file → Kubernetes
ConfigMap, mounted into the LiteLLM pod - API keys → Kubernetes
Secrets, mapped as environment variables --link/--network→ KubernetesServices(K8s has built-in DNS, pods find each other by service name)-p port:port→Serviceof typeLoadBalancerorNodePort-vvolumes →PersistentVolumeClaimsfor Postgres and Open WebUI (you want chat history and DB data to survive pod restarts)--restart unless-stopped→ automatic with K8s; it restarts crashed pods by default
I’ll cover the full K8s deployment with manifests in a follow-up post.
LiteLLM vs AgentGateway
This came up at the meetup so I want to address it here. Are LiteLLM and AgentGateway competing solutions?
The short answer is: not really. They solve different problems, and can be layered.
| Category | LiteLLM Proxy | AgentGateway |
|---|---|---|
| Primary Purpose | LLM proxy — unified access to 100+ models via OpenAI-compatible API | Agentic proxy — built for MCP, A2A, and agent-to-LLM traffic |
| Runtime | Python (FastAPI). Mature, widely adopted | Rust. High throughput, low latency, ~6× faster in benchmarks |
| Kubernetes | Helm chart available. Standard Deployment + Service | First-class K8s support with Gateway API CRDs and built-in controller |
| Security | Virtual keys, RBAC, SSO (enterprise), budget enforcement | mTLS, JWT, OIDC, pre-routing policy enforcement, OAuth for MCP tools |
| Agent / MCP / A2A | Basic tool use via chat completions. No native MCP or A2A support | Native MCP gateway with stateful sessions, A2A routing — core feature |
| Observability | Spend logs, dashboards, Langfuse/Prometheus/Helicone integrations | OpenTelemetry native, TTFT metrics, token attribution per team |
| Enterprise Maturity | Production-proven, large community, commercial enterprise tier | Linux Foundation project, v1.0 released March 2026, growing fast |
| Best For | Teams needing a battle-tested LLM proxy with spend controls | Orgs building agentic systems needing MCP/A2A governance at scale |
LiteLLM is a common and good choice today for most teams. It’s battle-tested, has a large community, and covers the core use cases well. AgentGateway is the one to watch if you’re building agentic systems — it’s specifically designed for the MCP and A2A protocols that are becoming the standard way agents communicate with tools and each other.
They are not mutually exclusive. You could use LiteLLM for LLM routing and cost tracking today, and layer AgentGateway in front of it as your agent infrastructure matures.
The bigger picture
Here’s the message I wanted to leave the meetup with, and it’s the same message I’ll leave here.
Your AI and agent workloads should traverse a central point of policy governance.
Right now a lot of teams are building AI features where every application has its own API keys, its own connection to whatever LLM provider it uses, and zero visibility into what’s happening across the organization. That might be fine for a prototype, but it doesn’t scale, and it creates real security and compliance problems.
A proxy like LiteLLM (or AgentGateway, or both) is that central point. Every LLM call goes through it. You get:
- Visibility: Who is calling what model, when, and at what cost.
- Control: Rate limits and budget caps per team, per key, or per model. Rogue applications can’t run up your bill.
- Security: Applications never hold real provider API keys. If a key is compromised, you rotate it in one place.
- Flexibility: Swap providers or models behind the scenes without touching application code. When OpenAI releases a new model, update the proxy config — your apps don’t change.
- Reliability: Fallback to another model or provider if one goes down.
This is exactly the pattern we already apply to other critical services. We don’t let every microservice talk directly to the database — we have connection pooling, access control, and monitoring. We don’t let every service handle its own TLS — we terminate it at an ingress controller or load balancer. LLM traffic should be no different.
A word on security
One thing that came up at the meetup and is worth calling out explicitly: in March 2026 there was a supply chain attack on the LiteLLM PyPI package. Versions 1.82.7 and 1.82.8 were compromised via a maintainer’s hijacked account. The malicious code stole credentials — environment variables, SSH keys, cloud provider tokens, Kubernetes tokens — and exfiltrated them to an attacker-controlled server.
The good news: the official Docker images (GHCR and Docker Hub) were not affected, as they were running 1.82.6. PyPI quarantined both versions within 46 minutes, but not before they were downloaded nearly 47,000 times.
The lessons are not new, but they’re worth repeating:
- Pin your dependencies and use lock files with checksums.
- Audit packages before upgrading, especially for production workloads.
- Be able to rotate credentials fast. If you had a central proxy, rotating your provider API keys after an incident like this is a single config change. If every application holds its own keys, it’s a much bigger problem.
This incident is actually a good argument for the centralized proxy pattern. The fewer places your real API keys live, the smaller your blast radius when something goes wrong.
Next post I’ll cover the full Kubernetes deployment with manifests. Thanks for reading!
Updated: April 8, 2026