Coder + F5 BIG-IP APM
In my last post I briefly covered how to install Coder with very basic config options. Now let’s configure authentication away from local accounts in Coder to an OIDC provider.
Architecture Overview
The BIG-IP sits at the edge and handles all the enterprise concerns: who can get in, via what method, and with what level of access. Coder sits internally and manages the lifecycle of dev environments — templated, reproducible, ephemeral.
Pre-requisites
- Coder server deployed
- I installed Coder on a VM:
curl -fsSL https://coder.com/install.sh | sh - Docker installed on the Coder server
- I have Docker configured to use a pre-selected IP range for the default bridge network 1
- I installed Coder on a VM:
- At least one Coder template defined (I use the built-in Docker template to start)
- Docker or Kubernetes available as the workspace runtime
Create a template and then a workspace
From the web UI it’s simple — create a template, create your workspace from this template, click Create. Within 30–60 seconds you have a fresh isolated environment.
The key thing I want to highlight: every workspace is ephemeral by design. Coder supports workspace autostop, so you can configure workspaces to shut down after a period of inactivity. For agentic AI workloads, I set a conservative TTL — the agent runs its task, the environment stops, nobody forgets to clean up.
Verify the environment
After creating the workspace, a quick sanity check:
1
2
3
4
5
6
7
8
9
10
11
# Confirm you're inside an isolated container
hostname
# → my-agent-workspace

# Check that no residual state exists from previous runs
ls -la ~
# → clean home directory, no lingering dotfiles

# Verify network isolation
ip addr
# → only loopback + container veth — no access to prod network
This is the point: each workspace is a clean slate. An agentic AI runs here, does its thing, and the environment is discarded.
Part 2: Configuring F5 BIG-IP APM for OIDC
This is where things get more interesting — and more enterprise. BIG-IP APM (Access Policy Manager) is F5’s solution for identity-aware access control. It handles VPN, ZTNA, SSO, MFA, OAuth, SAML, and more. It’s heavy machinery, but for organizations that already run BIG-IP, it’s incredibly powerful.
My goals here is to have APM handle authentication (who are you?) and authorization (can you access Coder?) before traffic ever hits the Coder server. Users should log in via APM and get SSO into Coder without re-authenticating.
Coder supports OIDC out of the box. APM can act as the OAuth 2.0 / OIDC Authorization Server.
Configure Coder using environment variables
In my last post I mentioned the file /etc/coder.d/coder.env. Here is the file now, with my OIDC settings configured:
1
2
3
4
5
6
7
8
9
10
11
12
13
14
15
16
17
18
19
20
# Coder must be reachable from an external URL for users and workspaces to connect.
# e.g. https://coder.example.com

#basic coder network config
CODER_ACCESS_URL=https://coder.my-f5.com
CODER_HTTP_ADDRESS='0.0.0.0:3000'

#OIDC config
CODER_OIDC_ISSUER_URL="https://auth.my-f5.com/f5-oauth2/v1"
CODER_OIDC_EMAIL_DOMAIN="f5.com"
CODER_OIDC_CLIENT_ID="xxxxxxxxxxxxxxxxxxxxxxxxxxxxxxxxxxxxxxxxxxxxxxxx"
CODER_OIDC_CLIENT_SECRET="yyyyyyyyyyyyyyyyyyyyyyyyyyyyyyyyyyyyyyyyyyyyyyyyyyyyyyyyyyyyyyyy"

# Scopes to request — offline_access gets you refresh tokens
CODER_OIDC_SCOPES="openid,profile,email,offline_access"

#additional OIDC config lines below
CODER_OIDC_IGNORE_EMAIL_VERIFIED=true
CODER_OIDC_SIGN_IN_TEXT="Sign in with F5 APM"
CODER_OIDC_ICON_URL=https://media.ffycdn.net/us/f5-networks-inc/qi443UWRoMTME9ELdEsJ.svg
There are many other configuration options that are set with either environment variables (as in the above file) or using flags at the command line. For a list of these, run coder server --help
After your coder.env file looks as mine does above, you can stop and restart the coder service. Coder will likely fail to start until your OAuth authorization server, confired above with the CODER_OIDC_ISSUER_URL option, is correctly configured.
Configure F5 APM as an Oauth authorization server
Now let’s configure APM.
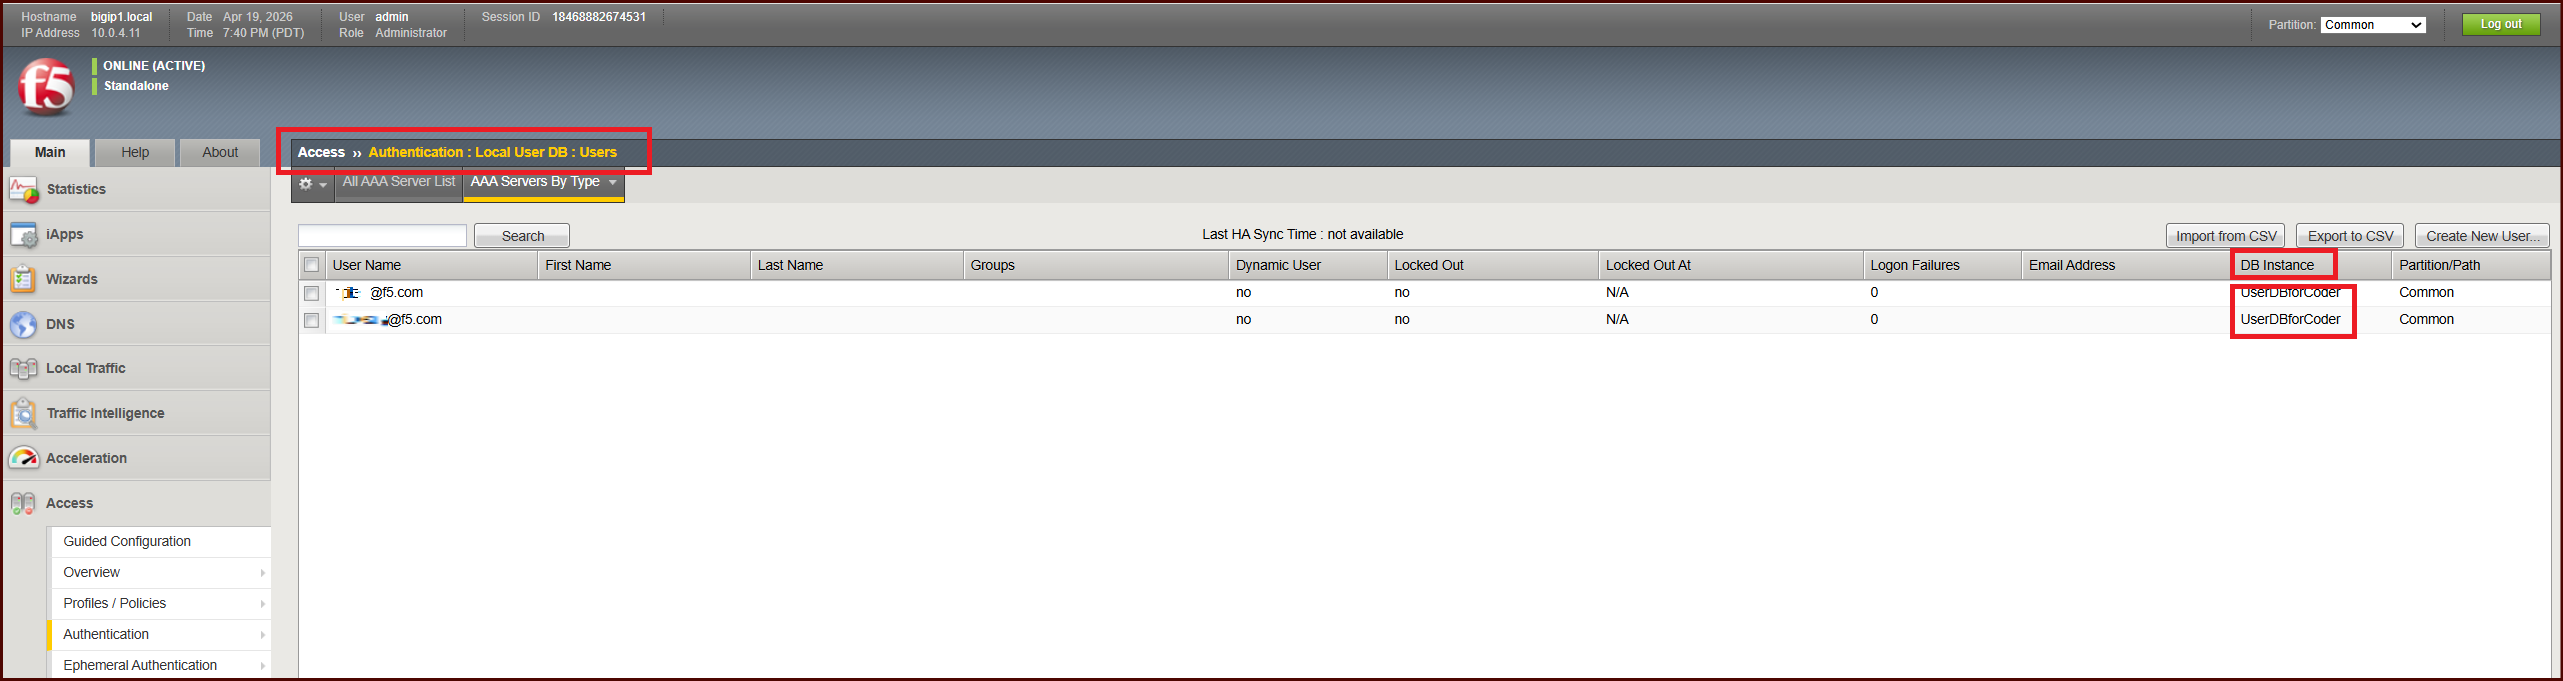
Create a local user DB
We will not use an external IdP such as Active Directory for this lab. I’ll use local user db on BIG-IP. Almost every enterprise setup would use another IdP, since AzureAD and other IdP’s are so common.
Access > Authentication > Local User DB > Instances.
- Create an Instance
- Create at least 2 test users
- Give them usernames in the format of email address (eg. john.smith@example.com)
- the email address domain should match CODER_OIDC_EMAIL_DOMAIN configured
- Do not require password change
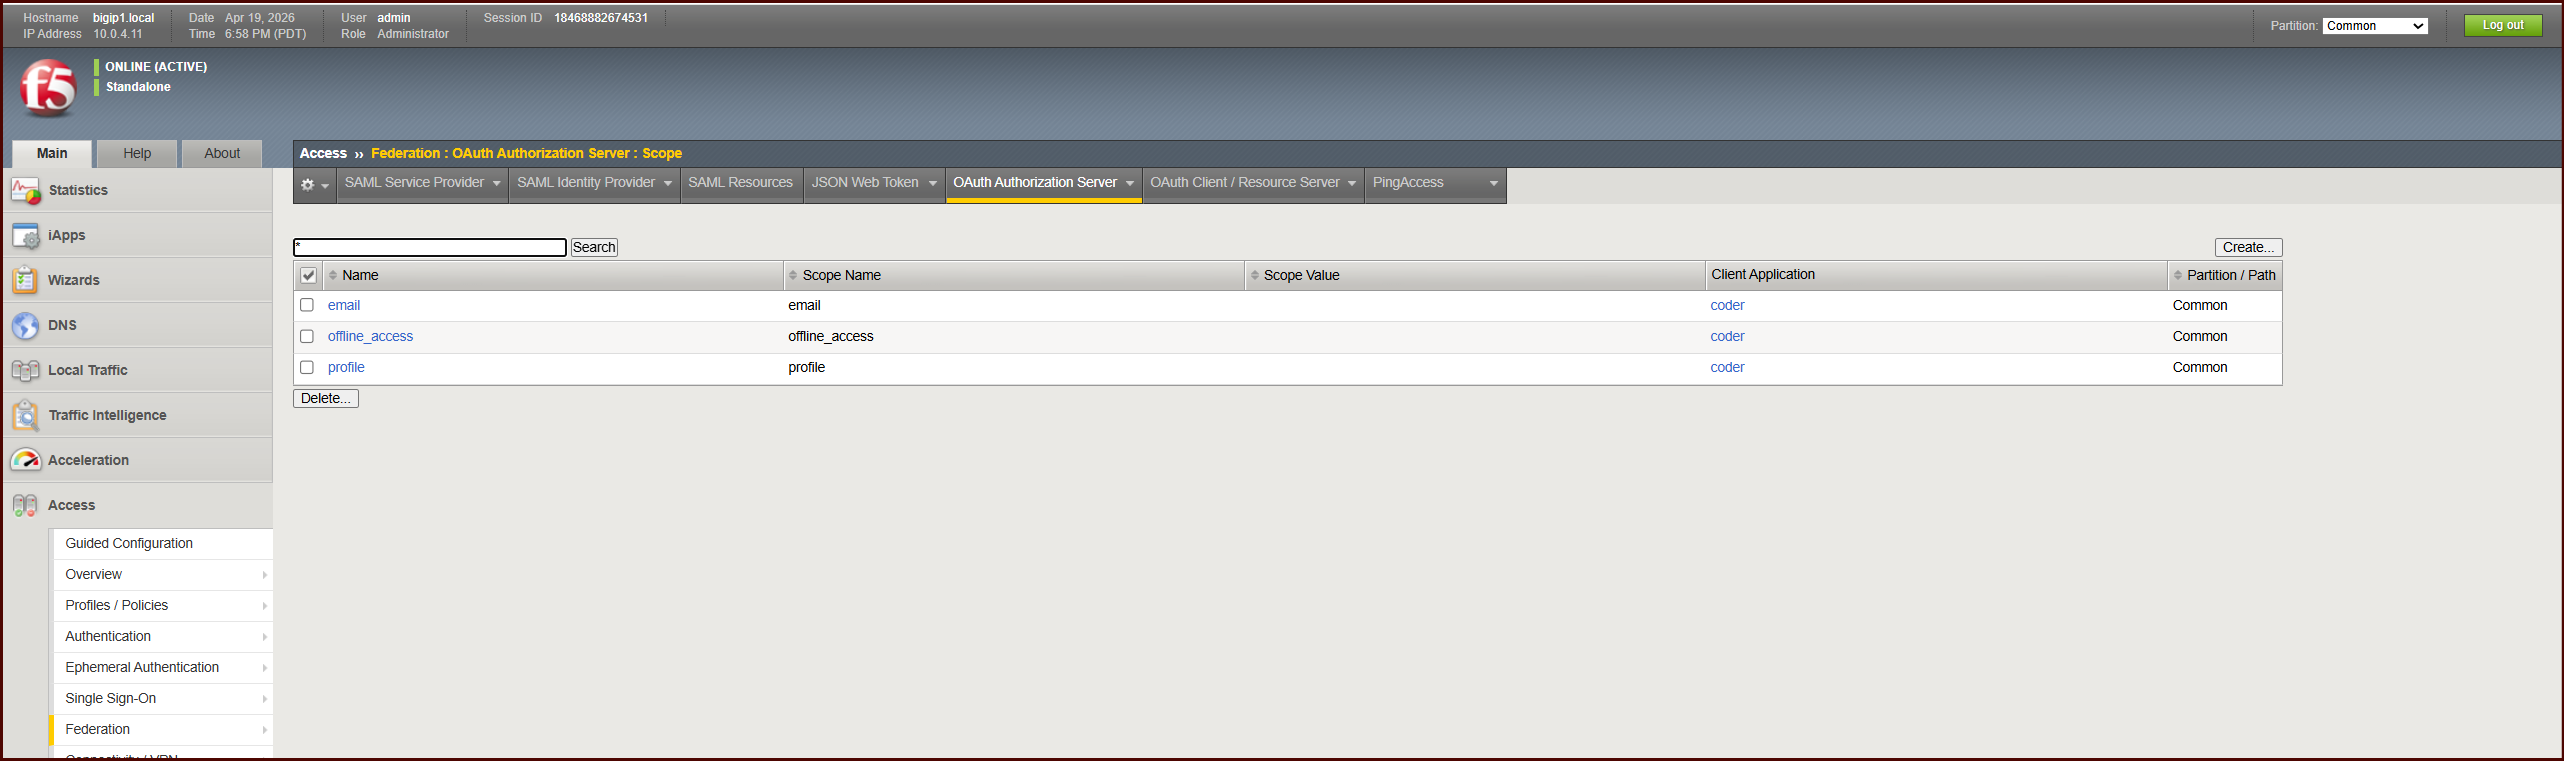
Create scopes
Access > Federation > OAuth Authorization Server > Scope
- Create 3 scopes, email, offline_access, and profile
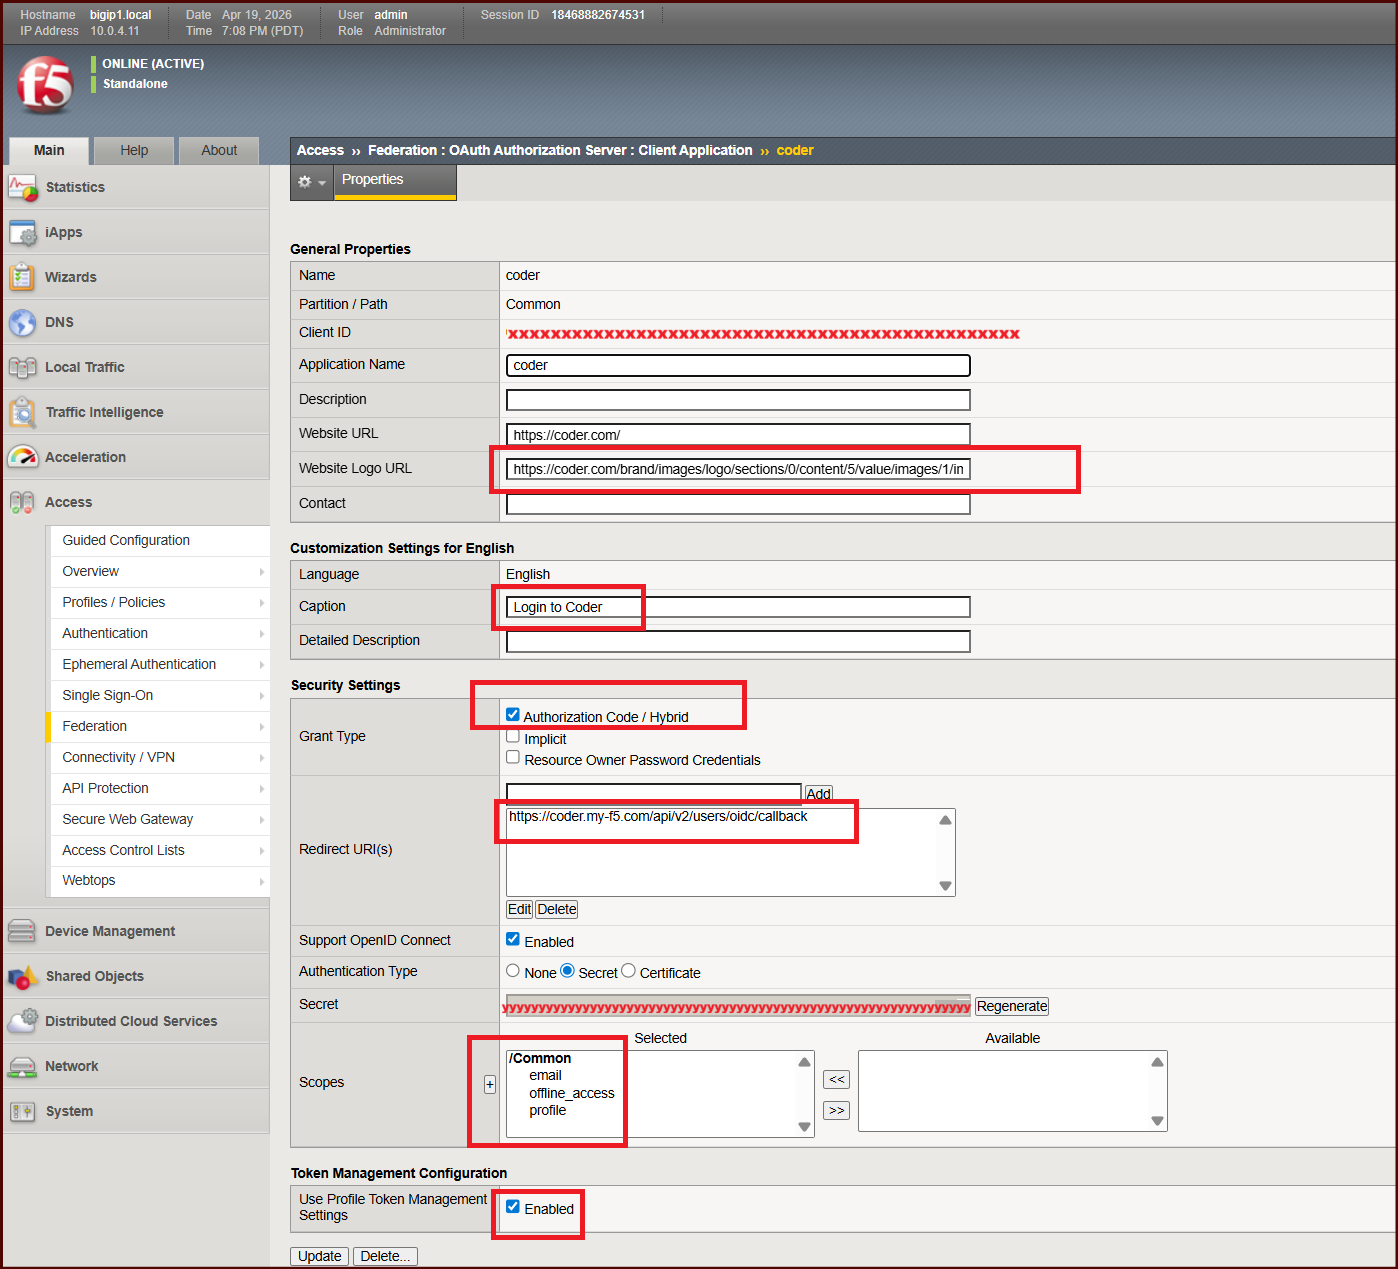
Create Client Application
Access > Federation > OAuth Authorization Server > Client Application
- Create a client application with a unique Client ID and Secret. These are what must match the values in the EnvironmentFile above.
- Notice the scopes are added to this application
- The Redirect URI must match what your Coder app will send. Coder’s instructions tell us this will be your CODER_ACCESS_URL + /api/v2/users/oidc/callback
- Ensure
Support OpenID Connectis checked, andAuthorization Code / Hybridis checked. - The Website URL and Website Logo URL are not critical, but the URL points to an image that makes the APM sign-on page look more appealing.
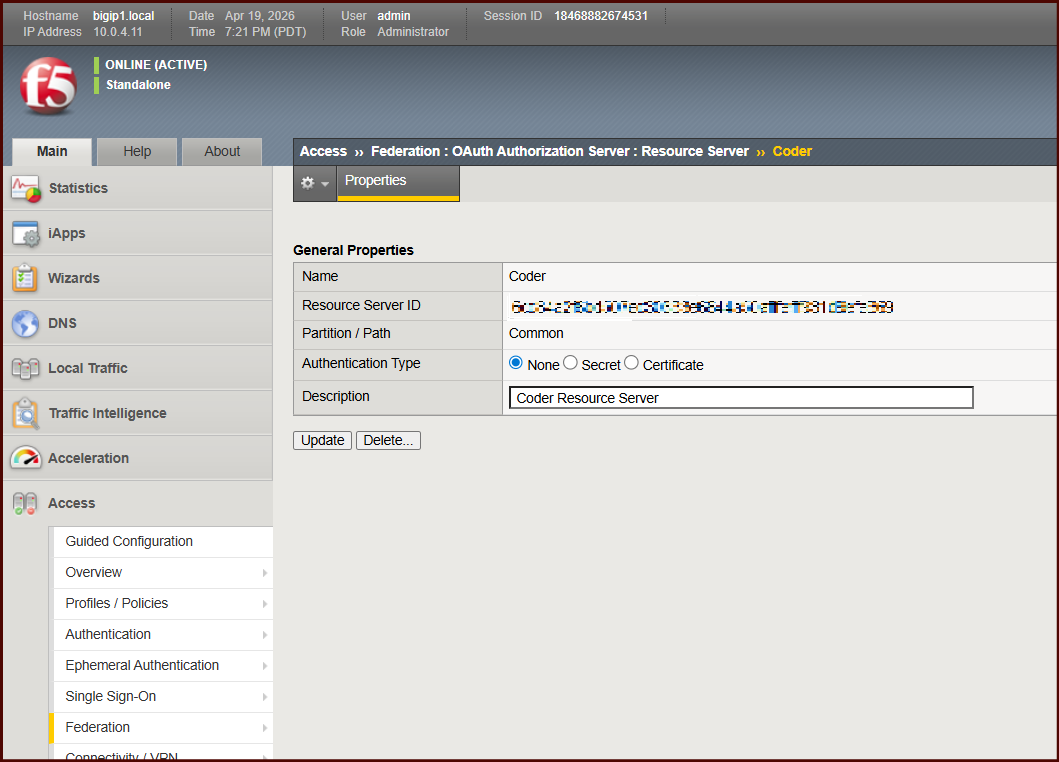
Create Resource Server
Access > Federation > OAuth Authorization Server > Resource Server
- Create a Resource Server. I have None selected for Authentication of this.
Configure JWT claims
Access > Federation > OAuth Authorization Server > Claim
- create claims to be included in JWT tokens issued by APM:
- Coder’s instructions tell us that we can include claims such as
email,username,preferred_username, andemail_verified. Running the –help flag will uncover more. - For this lab, I have only provided 2x claims:
emailandemail_verified, the second of which I set totruefor every JWT. I found that onlyemailis mandatory.
My F5 APM GUI stopped working at this point and I could not create claims via the GUI. So I created these 2 claims by editing the /config/bigip.conf file.
1
2
3
4
5
6
7
8
9
apm oauth oauth-claim /Common/email {
    claim-name email
    claim-value "%{session.logon.last.username}"
}
apm oauth oauth-claim /Common/email_verified {
    claim-name email_verified
    claim-type boolean
    claim-value true
}
Configure JSON Web Key (JWK)
Access > Federation > JSON Web Token > Key Configuration
Again, my web UI failed me and I couldn’t create JWK config via the GUI. I did so via TMSH, which I will share below
- Create a self-signed RSA cert and key pair to use for signing JWT’s.
- System > Certificate Management > Traffic Certification Management > Create
- I created a self-signed cert, named the object
JWT_Signing_RSA. - The Common Name is
self-signed-rsa-keypair-for-JWK - Key is 2048 bits
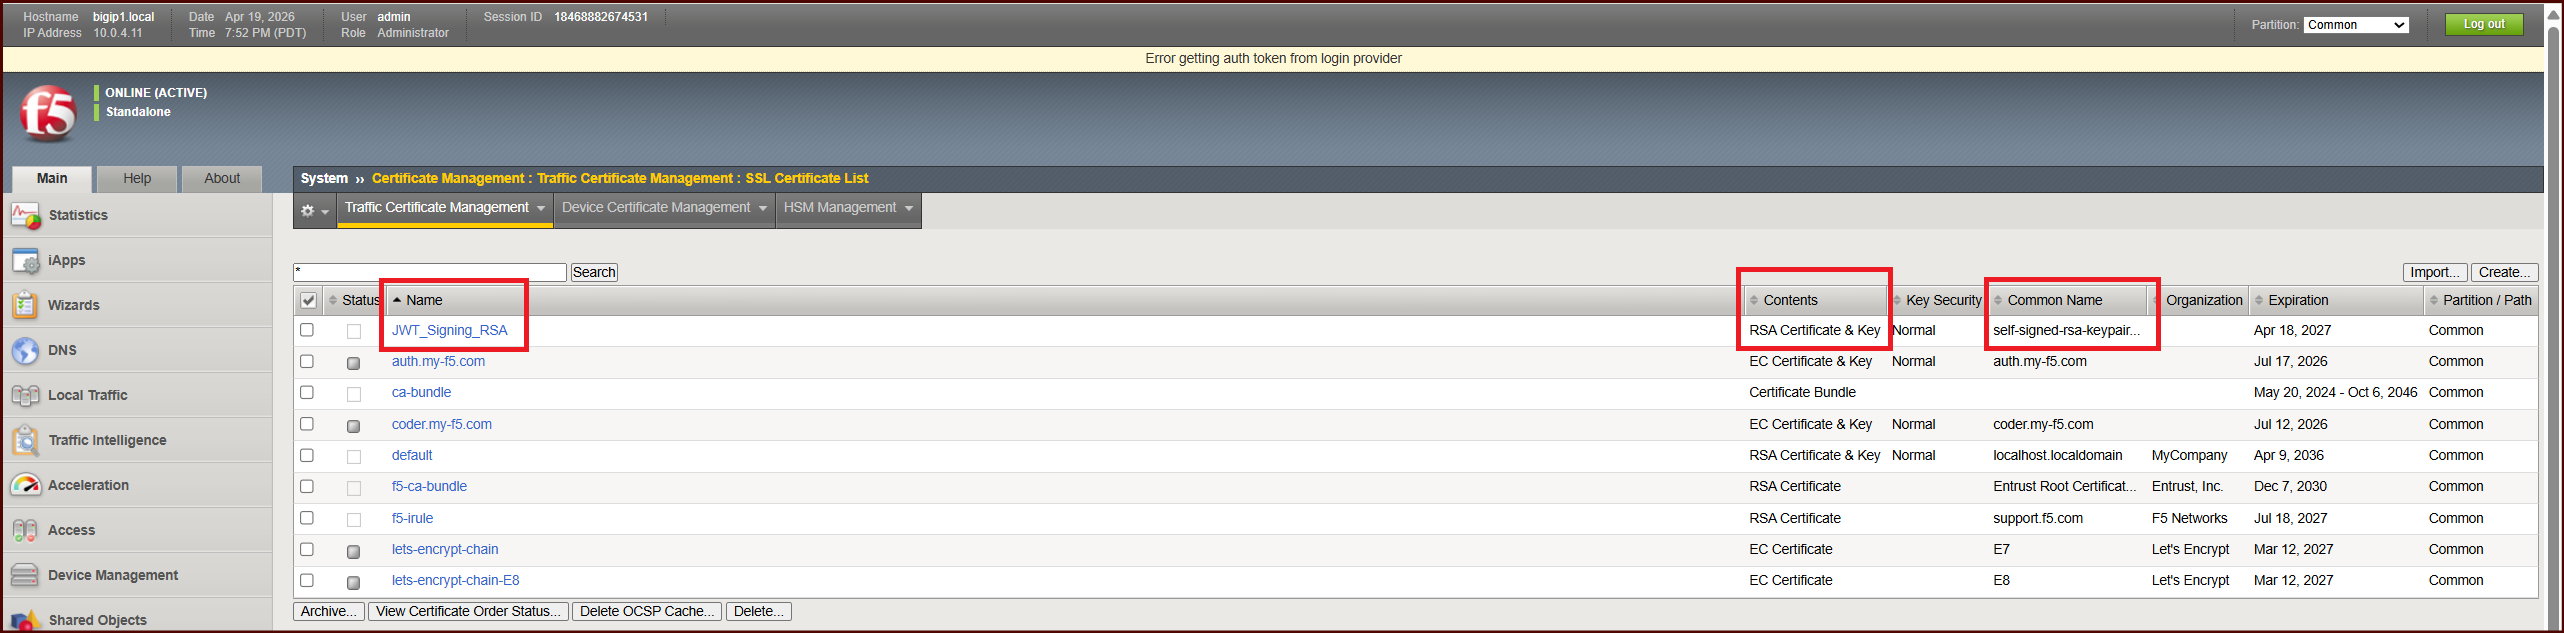
Now that I have a cert-key pair, I can run the tmsh command to configure JWK config:
1
tmsh create apm oauth jwk-config My_Manual_JWK { alg-type RS256 cert JWT_Signing_RSA cert-key JWT_Signing_RSA key-id "unique-id-123" }
Notice my JWK config is called My_Manual_JWK. This will be referenced later.
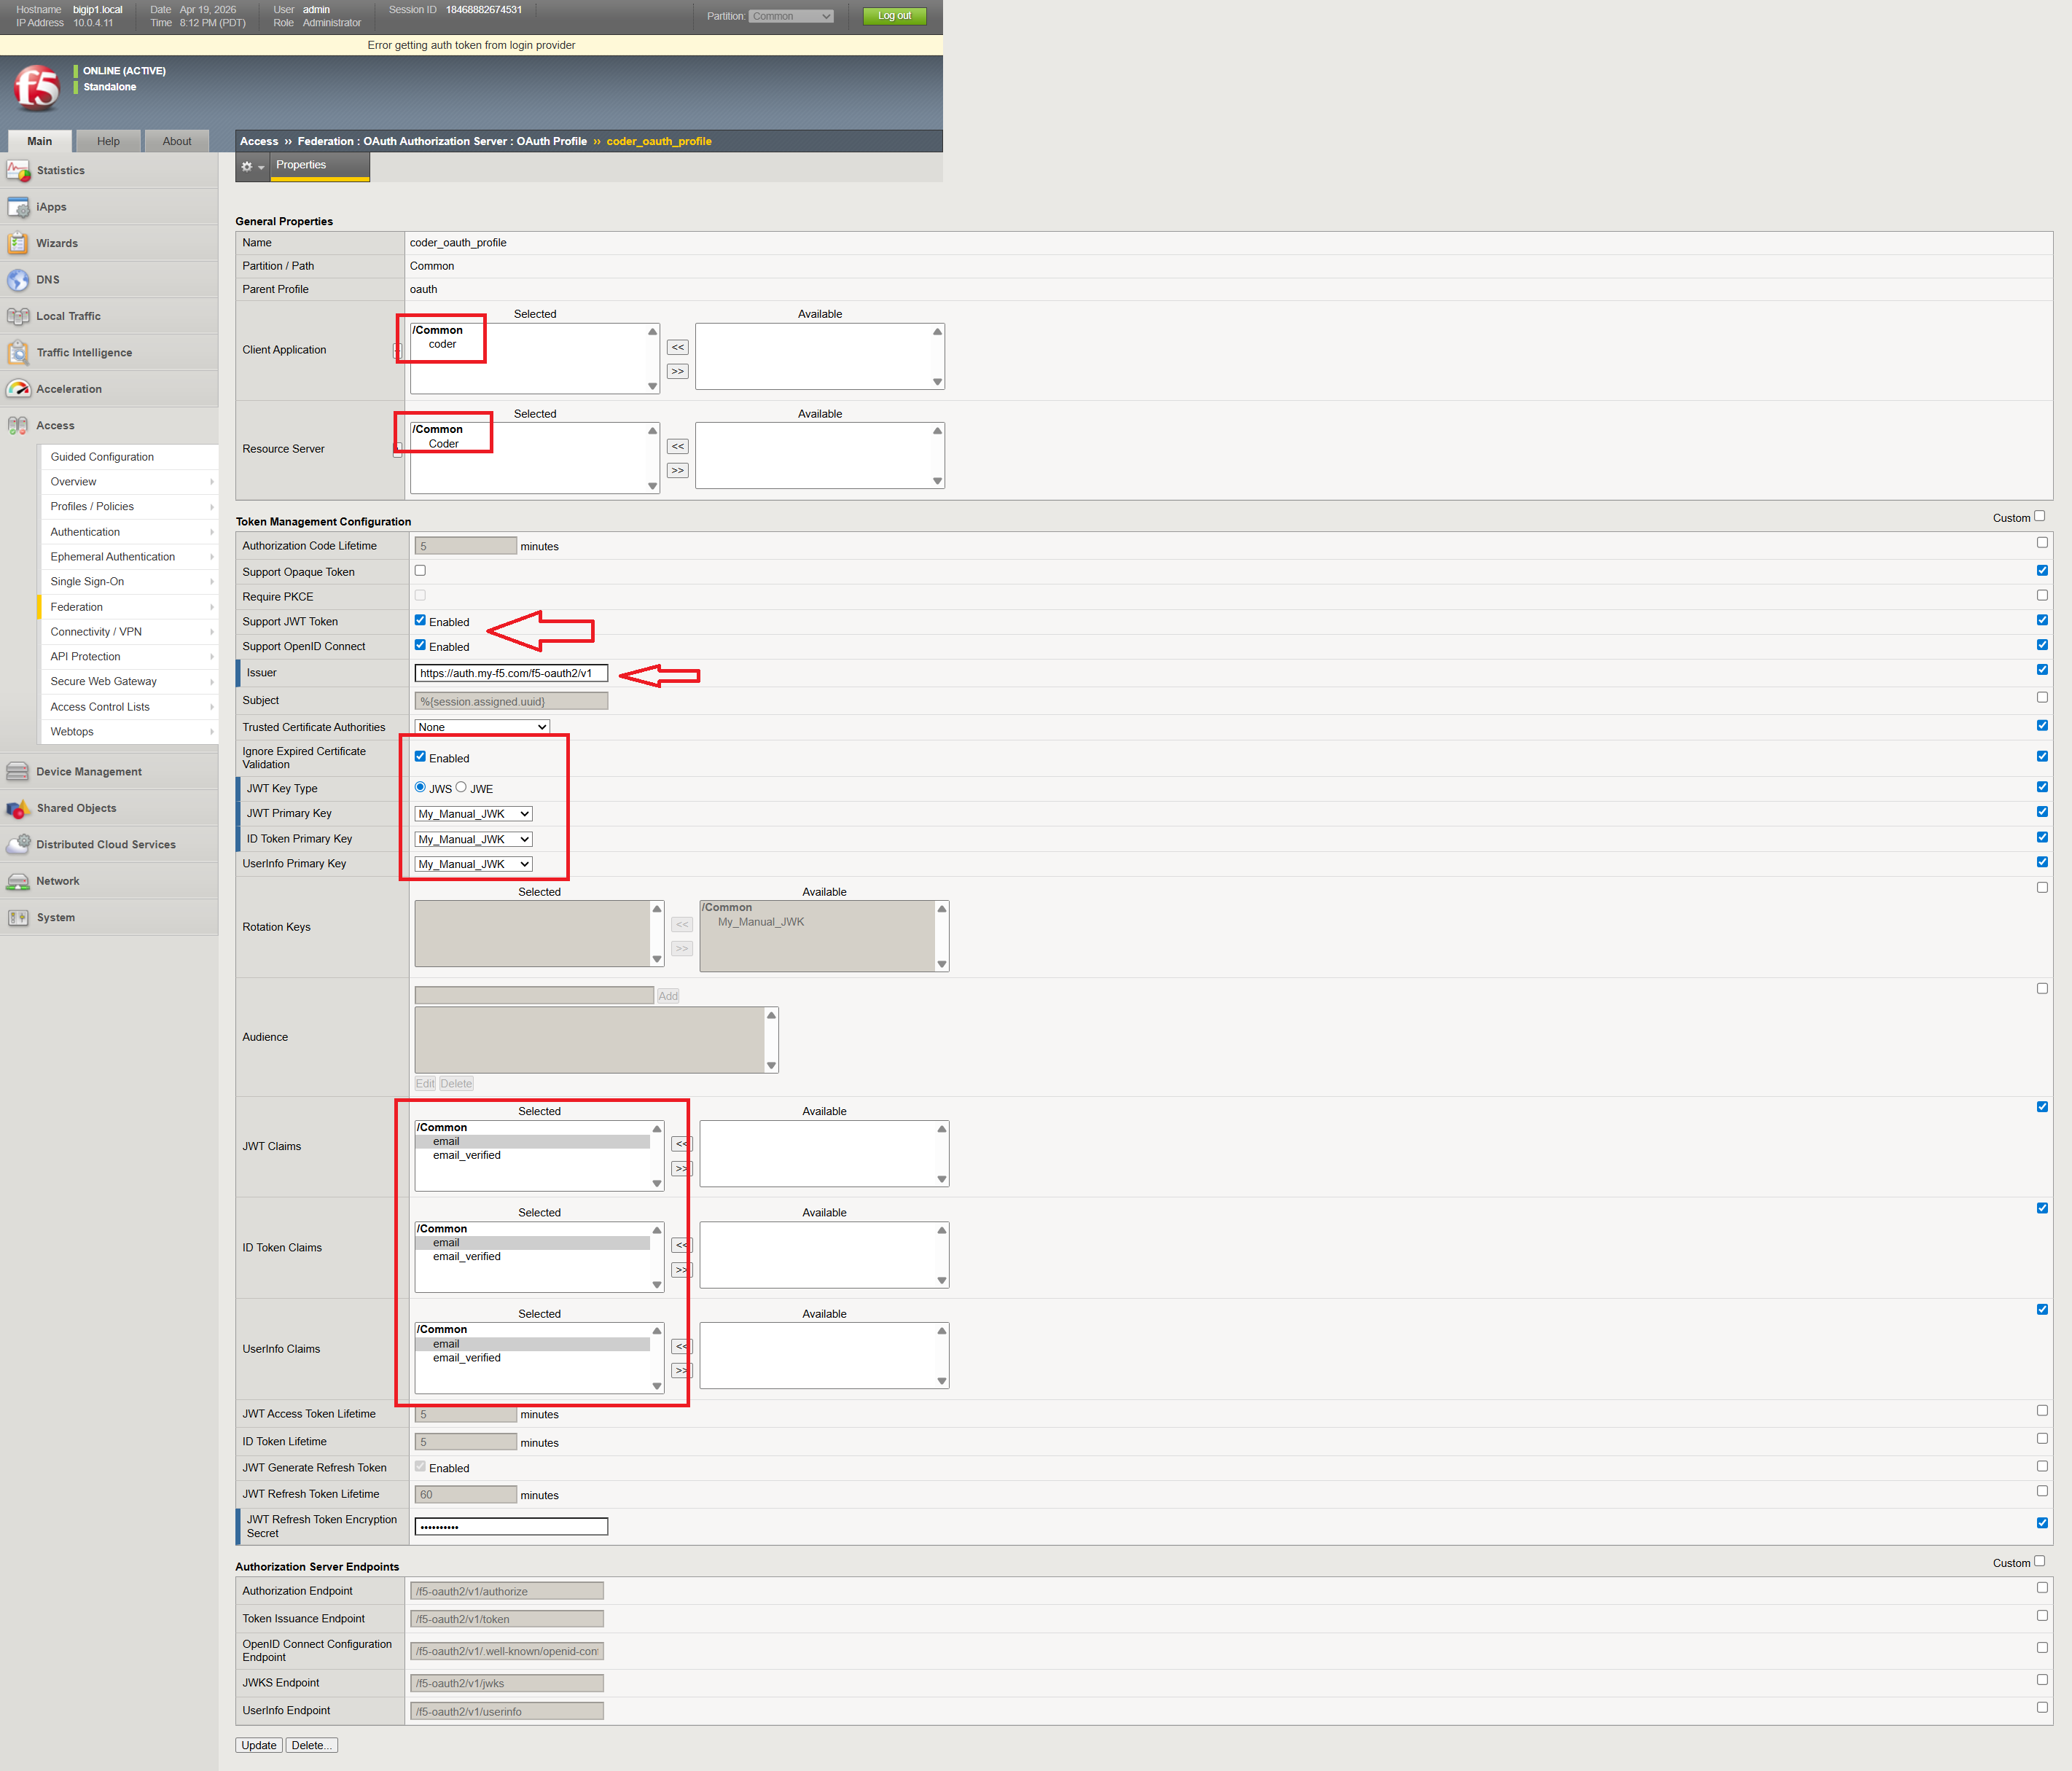
Create an OAuth Profile
Access > Federation > OAuth Authorization Server > OAuth Profile
- Client Application: reference your created object
- Resource Server: reference your created object
- Check the boxes for Support JWT Token, and Open ID Connect
- The Issuer URL is critical. This URL will be looked up by Coder and must match what Coder expects.
- Choose JWS, and JWT Primary Key, and ID Token Primary Key, as shown.
- create a JWT Refresh Token Encryption Secret. This can be anything but write it down.
Create an Access Profile (Per-Session Policy)
Access > Profiles/Policies > Access Profiles (Per-Session Policies ) > Create
- Create a Profile
- Profile Type: All
- OAuth Profile: Reference OAuth Profile created, as seen in screenshot
- Choose English
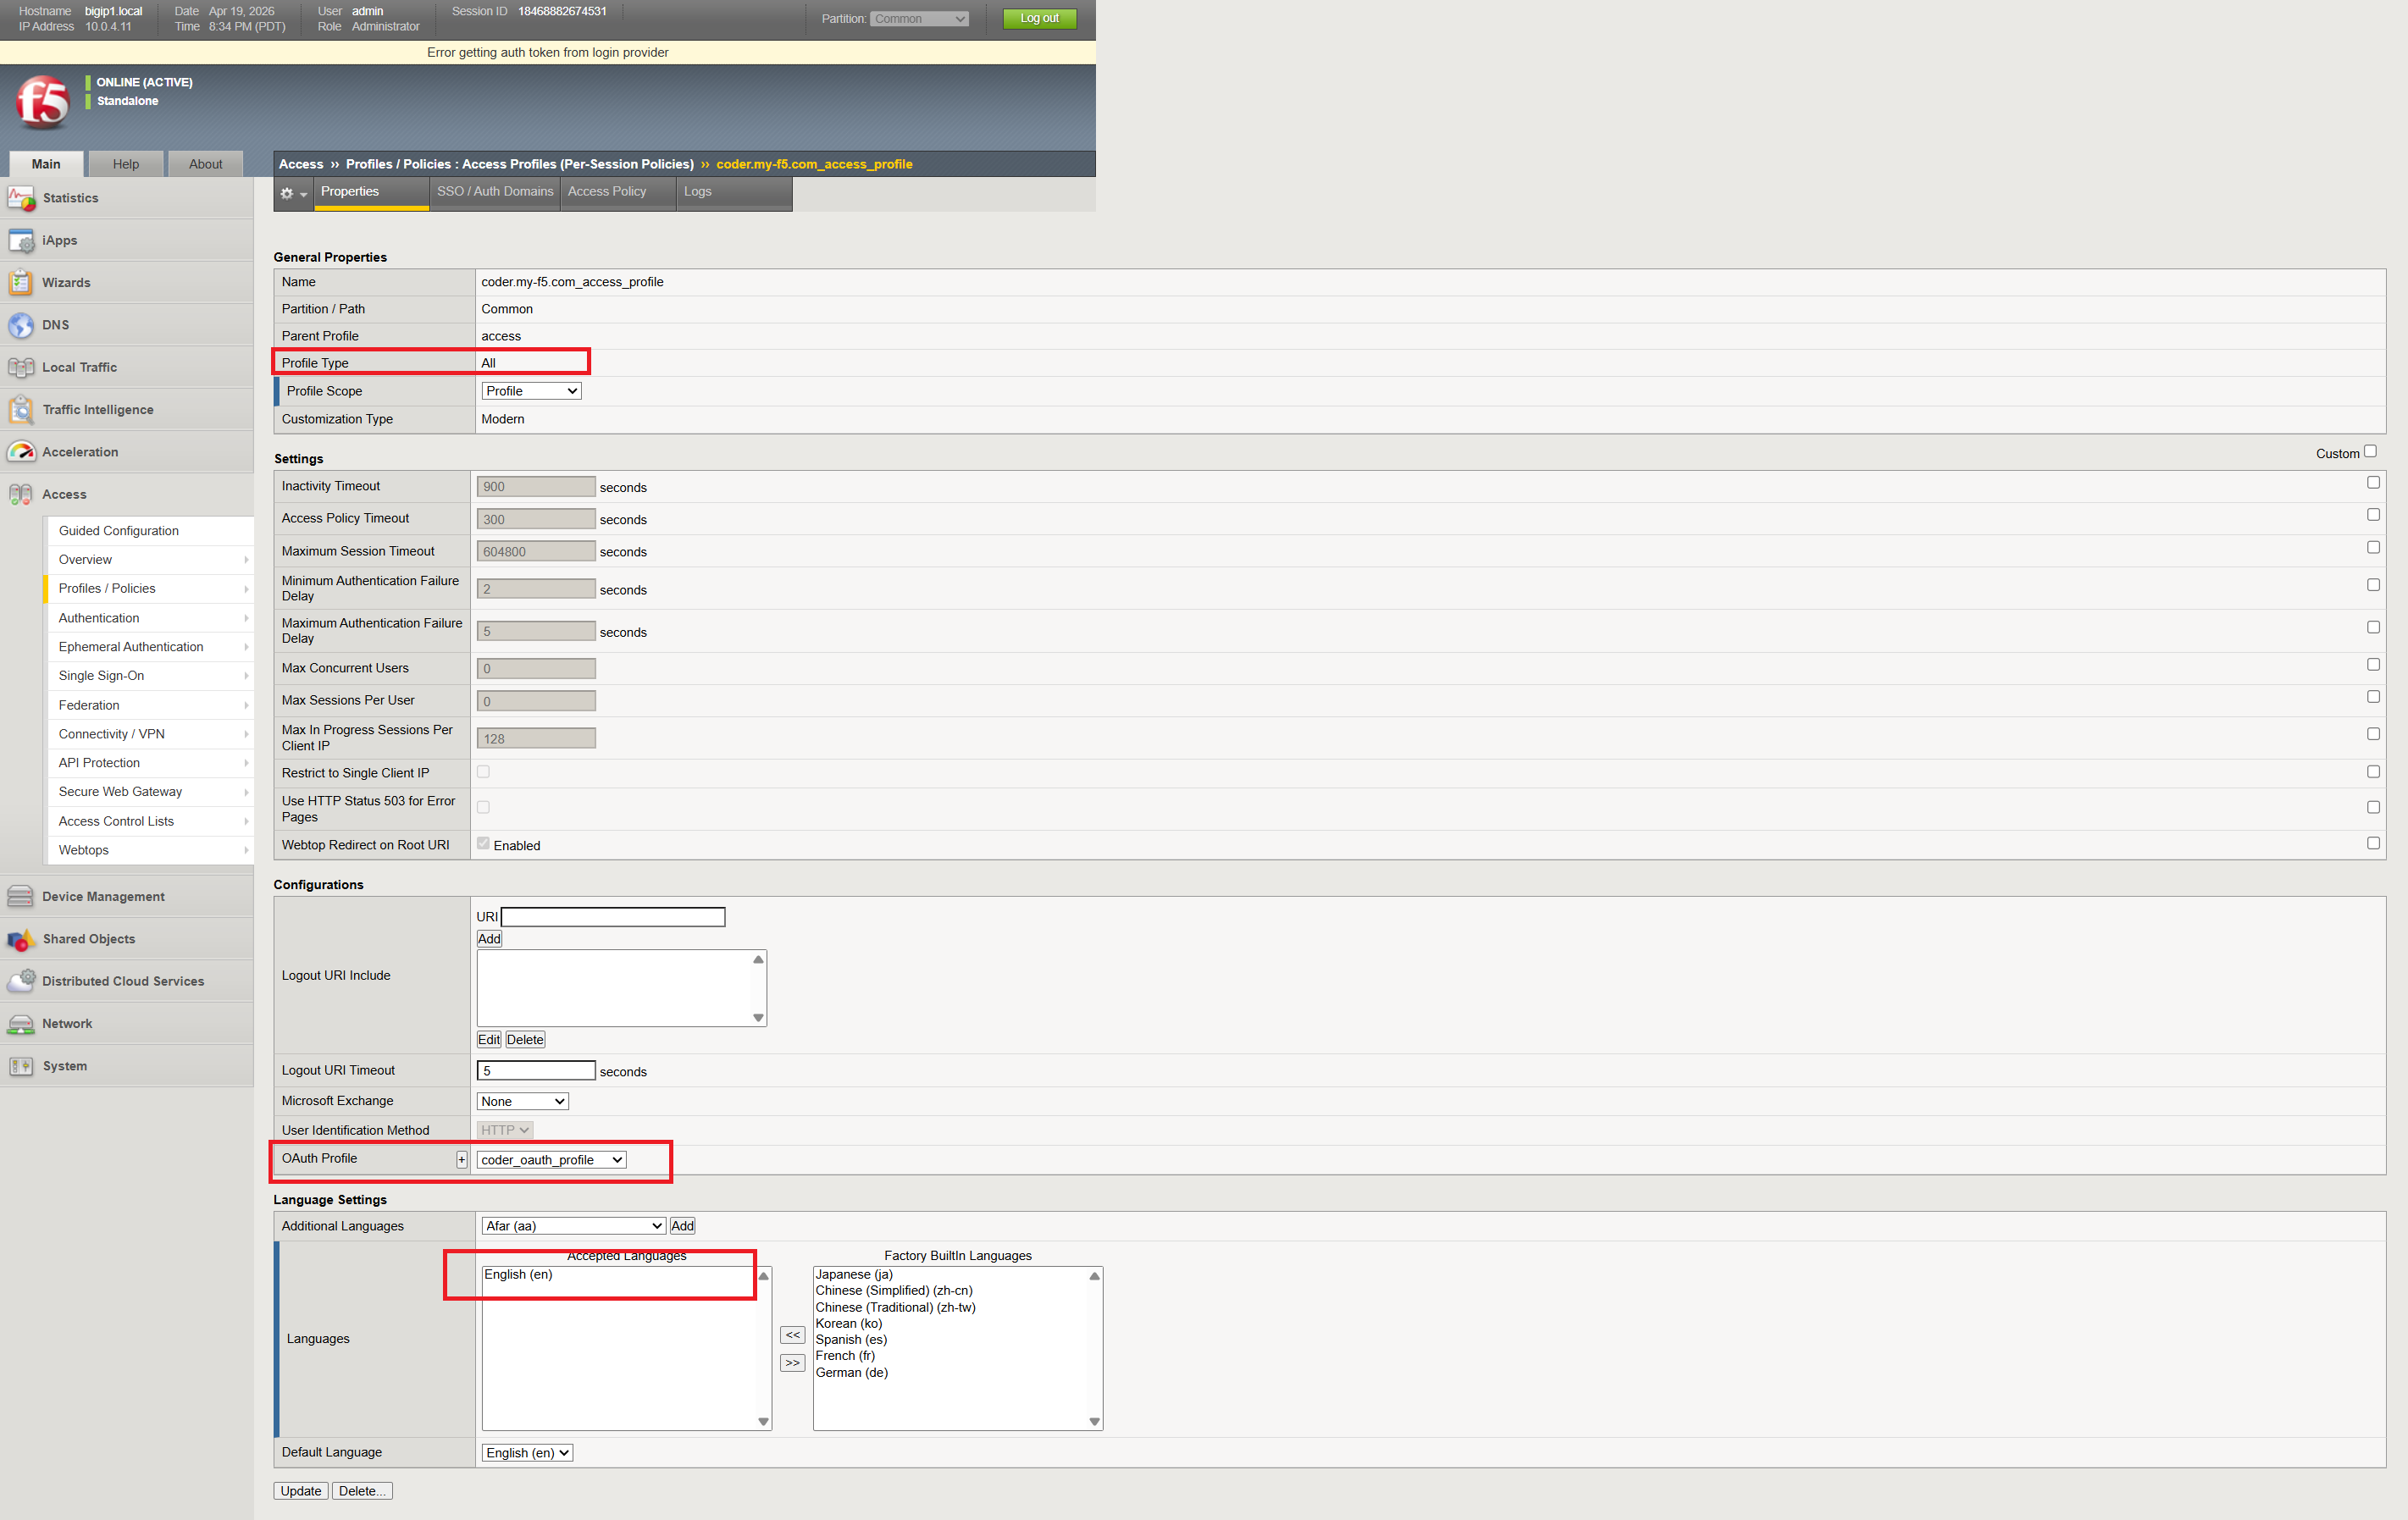
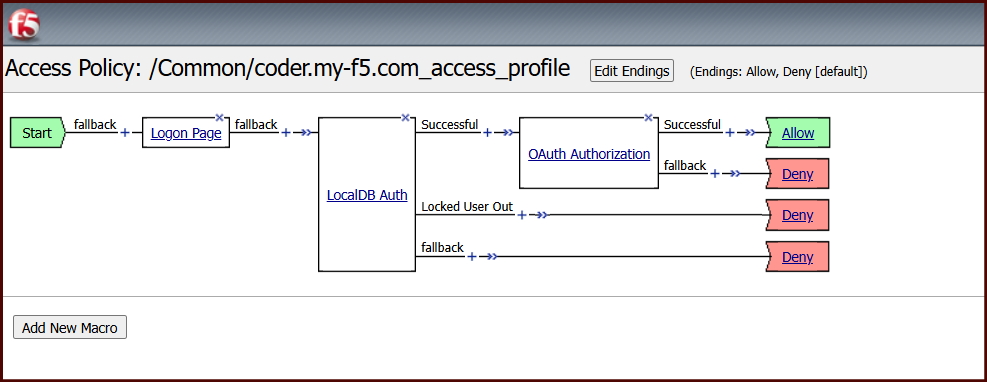
- Now, edit using Visual Policy Editor as seen in screenshot
Create a Virtual Server
- Create VirtualServer
- Configure a HTTP Profile
- Configure ClientSSL profile
- Configure Access Profile (Per-Session Policy)
Key takeaways
Ephemeral environments are a prerequisite for safe Agentic AI development. When the entity running code is autonomous, shared environments become unacceptable. You need clean slates, bounded blast radius, and short lifetimes. Coder delivers all three.
Enterprise access control is a first-class concern. It’s easy to prototype with a Coder instance that’s wide open on the network. In production — especially when AI agents are involved — you need identity-aware access. F5 BIG-IP APM is heavy, but it’s the right tool for organizations that already operate BIG-IP infrastructure. The combination of VPN tunnel control, MFA, group-based authorization, and header injection into Coder gives you a layered security posture without requiring changes to Coder itself.
Automation is the next step. Right now my workspace creation is manual. The obvious extension is an agentic workflow that calls the Coder API to provision a workspace, runs a task, and tears it down — all triggered by a CI event or an agent orchestration layer. The Coder REST API and CLI make this straightforward. The BIG-IP doesn’t need to know anything about individual workspaces; it just routes to the subnet.
Don’t skip the firewall rules. Header-based SSO only works if Coder is unreachable except through the proxy. Enforce this at the network layer.
References
-
I did this by stopping docker with
sudo systemctl stop docker.socket docker.service. Then, creating a file called/etc/docker/daemon.jsonwith my preferred CIDR block for the default docker network (see my previous post for this file). Then I deleted the default docker bridge withsudo ip link delete docker0and restarted docker withsudo systemctl start docker. ↩